We have a few rainbow crafts on the blog that we can call upon, however, having teenagers and pre-teens in the house, it’s good to push and encourage their creativity, as they have become more and more drawn to staring at their screens and not wanting to be quite as creative as they used to be…
So we have FOUND A WAY and that is stop motion animation – so – check this out, we set up a tripod, take a series of photos, and make an animation! What fun…
For this particular craft, we took a square canvas* and some old crayons, and got busy, you can watch the stop motion in the youtube link below….
You will need:
A Canvas
Some Crayons
Hair Dryer
Glue Gun (or tape, glue gun is quick and easy though!)
Watch the video here for instructions, basically, glue the crayons to the top half of the canvas.
Prop the canvas at an angle and start warming the crayons with the hair dryer.
Move the hair dryer to the top of the crayons, and start heating from the top so that they melt DOWN… note, the red didn’t melt as fast as the other colours, yet it still looks OK in the final result.
Lower the canvas to a smaller angle so that the crayons don’t drip off the end of the canvas, have fun, and don’t worry if the crayons ‘splatter’ that’s all part of the fun and creativity!
Thank you so much for dropping by, this post has been moved to my site incredibusy.com – do pop over there for exciting news on porridge and all the info you need on perfect porridge!
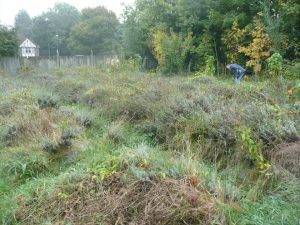
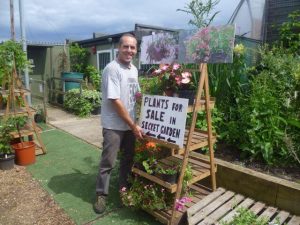
Community gardener and founder of yourspace.sutton Kevin Plicio runs local community garden nursery Seears Park Nursery in Sutton. This nursery runs on pure volunteer manpower and community spirit, running training courses and therapeutic activities in a calming and peaceful environment. He has been running the beautiful non-profit nursery for almost six years, transforming it from a run-down nursery to a social and stunning community hub which has just recently been opened to the public.
As his daughter, Hannah, I’ve grown up around the transformation of the park, seeing it go from overgrown and slightly wild, to open space and inviting. Perfect for family days out and picnics, the nursery offers scenic and photogenic open areas, free for the public to utilise.
Q- So, tell us about what made you want to run a community project? Well, the idea originally stemmed from me working at other projects, but these projects were all tailored to one specific group of people, or had one specific service, and I wanted to do something more socially integrating and open to all users, regardless of their background, age, or ability.
Q- What is there to see? Honestly, there’s so much! We have this really great pond that’s just teeming with life, frogs, fish, newts, and even in the evening we get the occasional duck family coming to stay – it’s such a sight! We also have vegetable patches, some art display inside the main classroom from a local artist Santiago Plicio, the polytunnels have a great plant selection, including a great cactus area. We’re also in the process of making smaller gardens as part of the garden nursery, where 6 out of the 16 planned are complete. We also have this really stunning willow circle, which is just beautiful.
thanks to Stephanie Krist for this photo
Q- Tell us about your volunteers, and who helps run the nursery. We have quite a large group of volunteers here at the nursery, and without them, there would be no way that the place could be running. Some people volunteer for a month, and some have been volunteering for years, and we appreciate every bit of help we get. Their generosity and time is something I’m always going to be so grateful for.
Q- You’ve just opened to the public for the first time in almost six years, how does that feel? It feels amazing, we’ve been getting this place ready for the public for so long and now it feels as if our work is finally paid off, and we can do what we’ve always set out to do, create a community project that everyone can benefit for. We’ve been running training courses and school placements for years which is so amazing, but now we can finally make it open to everyone, which was always the plan. We now run a plant sale every Saturday from 10:00am until 4:00pm, and the nursery is otherwise open Monday-Thursday from 9:30 until 5:30.
Q- Got any last words or comments that you want everyone to know? I’d just love to see you there! Bring your friends, family, dogs, come and experience and enjoy the nursery, see what’s here, and if you want to contribute in any way then we’d love to hear from you too!
Seears Park Nursery is open to the public from 9:30am-5:30pm Monday to Thursday, and 10:am-4:00pm on a Saturday for the plant sale and general public use. Follow them on Facebook for events and updates here
Note from Ali – Thank you so much, Hannah, for introducing me to your dad’s amazing community project. Here’s a picture of a pond that my 13-year-old son made, with the addition of the Junctus that he bought from the Nursery!
September means birthday cakes in our house, and every year the boys put in their requests for party fun and cake style and flavour… from a Star Wars themed Yoda, to a Dragon (same food colouring, so that was OK!) through to your standard Lemon Drizzle Cake… This year however, the party request was for trampolining, ‘free jumping’ and his OWN chocolate cake recipe! So 10yo-soon-to-be-11yo spent the evening before his birthday MAKING and BAKING his own cake, and a quick dash for some Maltesers in the morning, decorated it himself before we bundled five of his friends off to Acton for some bouncing action over at Oxygen FreeJumping. Well, we couldn’t be more impressed – all of us (five boys, and two mums) LOVED it – we started off with a game of dodge-ball – this was a great introduction, as we weren’t quite sure where to try first – the Oxygen FreeJumping staff were lovely and organised a game, explaining the rules, so we got stuck straight in! And guess what? I won!The design of the venue is stunning, the bold bright blues and yellows are really striking – loved the strong graphics – this place really IS jumping.
The boys’ absolute favourite activity was the Gladiator style jousting area over a large pool of blue foam… they spent AGES battling and giggling, and tumbling into a pit of spongy foam blocks.
I personally loved bouncing on the trampolines around the basketball hoops, probably because a simple bounce helped you score with EVERY throw!
Every participant wears a pair of ‘jumping socks’ which caused some amusement, and then delight that they got to keep them – and it was great to see the kids having such a brilliant time on the expanse of trampolines – we so want to go again!
A big thank you to the team at Oxygen FreeJumping, for their fabulous facilities, great family fun, and to the cafe staff who also made us so welcome with great coffee too.
With two boys, who seem to be growing bigger every week, we are doing that thing of contemplating extending the back of the house. When they were small, pre-school, it didn’t seem so crucial to have separate living and playing areas – Although, as they got to school age, establishing the sitting room as the ‘grown-up room’ gave back some tranquility and escape from the lego.
And now they are nearly as tall as me, we’ve had to buy bigger beds, with built in desk and wardrobe space, and had to rethink the downstairs living area…
As you know, we love ‘family cooking time’ where we bake and cook together as a family, yet these boys take up a LOT of room in our galley kitchen these days.
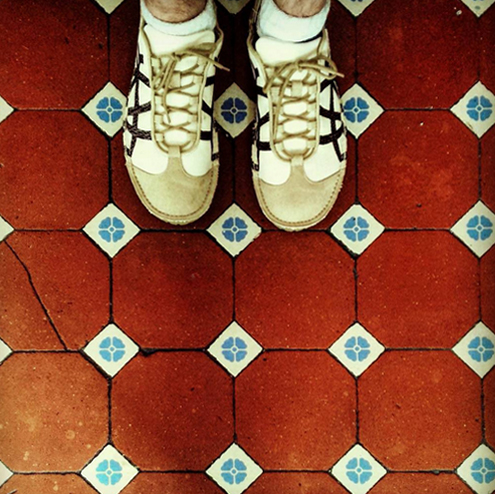
The kitchen is one area that we have not changed since moving in, and I LOVE our old Edwardian kitchen floor though, ridiculous as that sounds, these tiles make is so hard! It’s something I have been struggling to come to terms with inevitably having to say goodbye to these beautiful old tiles – unless we can find a way to incorporate them into a new layout!
So we’ve been looking at LOADS of different kitchen layout designs, to find a way to do this, perhaps with a glass box extension, to let in more light, without taking too much of our small mid terrace garden?
Or shall I just bite the bullet and go for something completely different and accept that change is as good as a rest as they say? There’s always the option of finding some new rather lovely tiles to play with! – watch this space!
Piper – a Minecraft toolbox for anyone to create and invent with technology. Build electronics. Invent power-ups. Create the future.
So – the kids were pretty excited last week to hear from Mark at Piper all about their fabulous new toolbox for budding engineers who happen to like Minecraft!
As a family we tend to use ‘screentime’ as a reward at the end of the week, for best behaviour, and finishing homework without it being an excruciating teeth-pulling exercise. Minecraft is their favourite ‘go to’ game, and without further ado, read what our 10yo thought of Piper, and then watch the video!
In short, my son, 10yo RB says this:
“Minecraft toolbox – Build electronics with Piper. Piper is brilliant for seven and ups. I think it is really awesome because the instructions are in the game so it would make children and adults interested in making things outside of the game. Minecraft is a good way to get people that like Minecraft to play it. It will make a brilliant Christmas or birthday gift. It will entice people to play because it is easy to build so you can get started really quickly. Raspberry Pi is what all of the software runs on. Raspberry pie is a mini computer if you’ve got all the right equipment and gadgets luckily all of that comes in a really well made wooden box. The screen comes readymade and all fits in.
There are ten action-packed levels to complete in the game. You have to make your own buttons and fit the wires in the right places. The mouse comes with the box so you can look around.
There are lots more interesting exciting things about the game but they are for you to find out.”
RB Age 10 says – “NOW watch this video!”
How it works:
– First you assemble the wooden toolbox and connect it with the Raspberry Pi 2, a 7 inch LCD display, a power bank, and an assortment of electronics.
– Once assembled, you enter a Minecraft adventure map viewable on the LCD screen.
– Your Mission: guide a robot to rescue astronauts on a foreign planet. The robot’s hardware is damaged on the way over, and you have to build it in real-life to control the robot in the game to save the day!
How this educates kids:
– Each gadget you build gives you a special power-up and progresses you through the game
– First build the controller to navigate your robot. Add switches to activate hidden bridges and doors. A row of lights to serve as a proximity sensor and more.
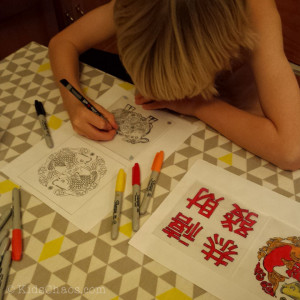
My little blonde boys are both incredibly fascinated by the Orient, and at the beginning of every year are keen to go to Chinatown to celebrate Chinese New Year. We are lucky enough to be close to London’s Chinatown and a couple of years ago they bought some rather lovely window clings, graphic and colourful, but really too big for their bedroom windows in our Edwardian house.
So this year, we came up with a fun way of making their own, from a template I created here (and if you click here and here you can download and print these Chinese New Year printables yourself too).
You will need:
1) Print off the Chinese New Year printables template here and here
2) Packet of Sharpie Pens (*which you can get here in the UK and here in the US)
3) Pack of Clear CD wallets or any plastic stationery sleeves
4) Blu tack
Instructions:
1) once you’ve printed off the Chinese New Year printables template, blu tack the clear plastic cd wallet into position over the graphic and start tracing around the illustration with a black sharpie pen.
2) Then simply colour in with a selection of reds, yellow, oranges. Or if you fancy a change, try a range of greens and blues – that looks great too!
3) When you’ve finished, take the CD wallet and blu tack it to the window! voila!
To watch a video of how we did these Chinese New Year printables, pop over to Red Ted Art’s YouTube channel here where we have made a guest appearance (again!) showing you how to do this, you’ll notice that I got bored with the colouring in bit, and Maggy had to take over… as a Chinese inspired art project however, both of my boys LOVED doing these, and it kept them busy and quiet for AGES!
10 yo specifically asked for a sheep… as it IS year of the sheep!
The boys just love a paper craft, and we can thank our lovely friend Maggy for that (she told me to say that…) – Maggy taught them how to make origami paper boats when they were very little, and now at 10, the youngest is forever making Ninja Stars, Jumping Frogs and Paper cranes – and now his latest, the Traditional Paper Star.
For this lovely origami traditional Paper Star you need 14-15 square origami sheets, of various colours (we tried to persuade him to make them in Christmas colours, however, he is ‘his own man’ and went with these colours!) It literally only takes minutes to learn how to make this!
Fold each piece of paper to the long triangular shape, follow the youtube instructions linked here… demonstrated by the lovely Maggy from RedTedArt… and insert one into another until you join the first with the last to create this star shape – how lovely, we’ll be hanging this creation on the Christmas Tree next weekend!
So, we decided to make some Papier-mâché hot air balloons… that’s how it started out, all good intentions.
So 7yo being the possibly more crafty of the two (yep, the 5yo is crafty in other ways, say no more) got stuck right in….
1) We made the glue: mixed one cup of flour, and two cups of water, and a teaspoon of cinammon (that way it smells nice too)
2) We ripped the newspaper into strips
3) 7yo took off his brand new hoodie as he didn’t want to get it mucky
4) We pulled each strip through the ‘glue’ and let it drip back into the bowl (AND all over the garden too, much to SAHD’s delight)
5) We layered and layered until the balloon (Oh, I didn’t mention that bit did I? – blow up a balloon, and balance it on a bowl to stop it blowing or rolling away) was covered in paper mache.
Then we had to leave it to dry for a day (which is where 5yo lost interest, so I’d say stick with one layer if you’re not bothered about keeping the masterpiece for ever!)
We learnt an important lesson here, on Day 2 when we went back to add another layer, 7yo’s balloon had shrivelled, but we layered on some more paper mache…. MISTAKE, with no balloon inside to hold it’s shape this happened…
Not to be out-witted by the wilted balloon, 7yo spun it round (phew, was waiting for a tantrum) and said he would make it into a meteorite – which is what he did! Job done…
Thanks to Maggy at RedTedArt for continuing to encourage us to ‘get crafty!’
For as long as I can remember, our eldest son has been pestering us for a mobile ‘phone.
We have resisted by telling him that he cannot have one, in fact does not need one…until AT LEAST he is at secondary school….
Well, that came around quickly… September was looming, so we started to look around for an affordable ‘phone for him. And found this Pay as you go on Three and a rather funky Nokia Lumia 520 Cyan perfect for ‘Big School’ (I’m guessing I will not be allowed to refer to it as big school anymore right?) So the plan is to get that for him for September as promised.
Anyway, end of Year 6, and the school takes the class of 28 children off to France for a week, and what does 11yo do a month before he is due to board a ferry? He leaves his MP3 player in his jeans’ pocket and ummm, I washed them, in the washing machine…And, yes, it no longer works.
And the poor thing was beside himself! “How can I listen to music on the coach trip to France?”.
So we checked with the teacher, and without the SIM card, he has been permitted to take the mobile phone away to France with him… Fingers crossed it comes back in one piece, and YES, he WILL be ceremoniously emptying every pocket before ANYTHING goes into the washing machine this weekend! And watch this space for a new Instagrammer – he can’t wait to get started 🙂

 There are lots of creative things you can do with crayons!
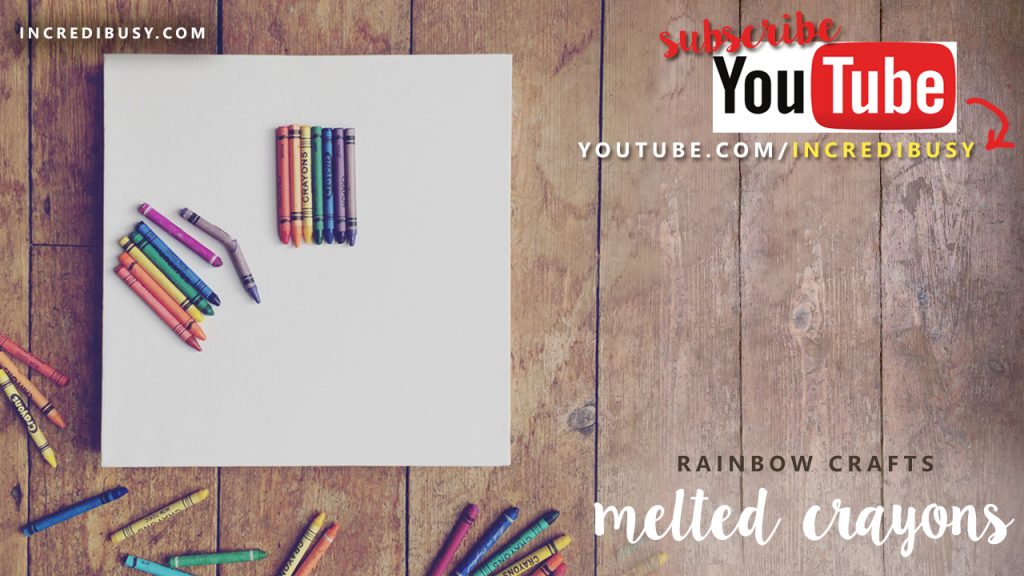 Watch the video here for instructions, basically, glue the crayons to the top half of the canvas.


 Q- So, tell us about what made you want to run a community project?
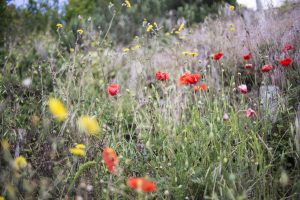


 The design of the venue is stunning, the bold bright blues and yellows are really striking – loved the strong graphics – this place really IS jumping.
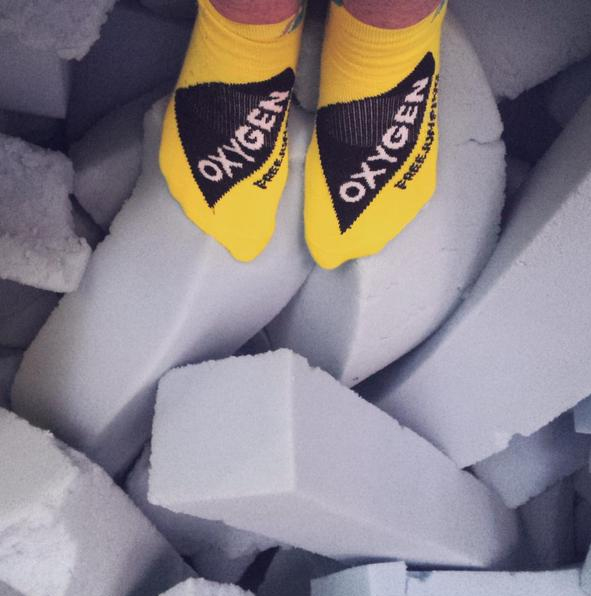


 So – the kids were pretty excited last week to hear from Mark at
  How this educates kids:
 My little blonde boys are both incredibly fascinated by the Orient, and at the beginning of every year are keen to go to Chinatown to celebrate Chinese New Year. We are lucky enough to be close to London’s Chinatown and a couple of years ago they bought some rather lovely window clings, graphic and colourful, but really too big for their bedroom windows in our Edwardian house.

 1) Print off the Chinese New Year printables template
  1) once you’ve printed off the Chinese New Year printables template, blu tack the clear plastic cd wallet into position over the graphic and start tracing around the illustration with a black sharpie pen.

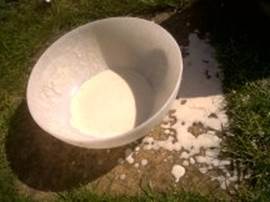 1) We made the glue: mixed one cup of flour, and two cups of water, and a teaspoon of cinammon (that way it smells nice too)

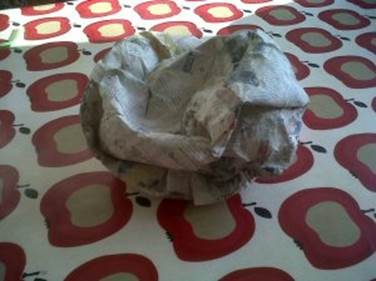
 We learnt an important lesson here, on Day 2 when we went back to add another layer, 7yo’s balloon had shrivelled, but we layered on some more paper mache…. MISTAKE, with no balloon inside to hold it’s shape this happened…
