Uncategorized

As a busy parent, it can feel like you’re constantly spending money. From the weekly shop and clothes, to extracurricular activities and school supplies, it can be hard to save money. But it doesn’t have to be impossible. With a few simple strategies and tips, you can learn how to save money as a busy parent.

You can make life easier and still get what you need for yourself and your family. From cutting costs on everyday items to finding ways to save on your monthly expenses, there are plenty of ways to trim your budget and put some money away for a rainy day. So, ifc v;laZ you’re looking for ways to save money as a busy parent, here are some tips that can help.

Create a Budget and stick to it

A budget is the key to saving money. There’s no way to get around it. If you don’t know how much you’re spending or where your money is going, you won’t be able to save. You’ll also have no idea where you can cut back and adjust your spending if you need to. It’s not as difficult as you might think to create a budget, either. You just have to be willing to put in a little time and effort up front to make sure you have everything laid out and recorded. For most people, the hardest part of the budget comes at the beginning when you’re trying to track everything. Find a method that works best for you. Some people like to use paper and pencil; others prefer to use an app. Whatever method you choose, make sure you’re consistent and thorough.

Get Better Deals With Local Car Insurance Brokers

Car insurance can be a costly expense, especially for families with multiple drivers.

If you stick with the same insurance company year after year, you’re likely overpaying. In fact, many people who have maintained continuous coverage with the same company don’t even realise they could be getting a better deal by shopping around and comparing rates with other insurance providers. If you’re looking for ways to save money as a busy parent, you may want to consider switching to a local car insurance broker. Insurance companies like these often provide cheaper rates than what you may be able to get through your current insurer. You can find local brokers by searching online for “car insurance near me”, or you can check out this comparison site that compares the top car insurance brokers in your area.

Photo by Markus Spiske on Unsplash

Buy Second-hand

Photo by Markus Spiske on Unsplash

Some things are best purchased new, but others are better off second-hand. For example, kids grow out of clothes quickly. Instead of spending money on new clothes all the time, consider buying them used. Kids’ clothes often look brand new when they’ve been outgrown, and they can be found for a fraction of the cost.

You can also sell clothes your kids have outgrown, too, to help offset the cost of buying them second-hand. You can find used toys and other items at charity shops and online marketplaces, too.

This post is written in association with Quote Zone.

baking, cooking, cooking with kids

Lemon drizzle cake with ground almonds

lemon drizzle cakeWhat’s your favourite cake in your house? Ours has to be lemon drizzle cake…

we’ve have the recipe scribbled down on a piece of paper, shoved in the cake section of Delia’s cookbook, for years… Quite fortunate it’s our favourite cake really, as we sort of OVER-ORDERED the lemons on our Ocado delivery on Friday, and ended up with 12 lemons, yes, TWELVE lemons… oops!

So we wanted to share the recipe with you, and tbh, it makes it easier to find if we write it up on KidsChaos, as we just google ourselves ‘ kids chaos lemon drizzle’… 🙂

Admittedly this recipe doesn’t use all twelve lemons, however we make two lemon drizzle cakes at the same time as it disappears pretty quickly here, and we like to have it in our packed lunches in the week, in place of shop-bought snack bars (so just half the quantities if you only have a 1 litre loaf tin)

Lemon Drizzle Cake Ingredients:

350g caster sugar
350g butter, softened
4 unwaxed lemons
6 eggs
200g self-raising flour
150g ground almonds
A drop or two of milk
200g demerara sugar

Lemon Drizzle Cake Instructions:

1. Pre-heat the oven to 180C/160C fan. Grease and line two loaf tins with greaseproof paper. Beat together the caster sugar, butter, and the finely grated zest of two lemons until light and fluffy. Add a pinch of salt and beat in the eggs, one at a time.

2. Sieve the flour and fold in, then add the ground almonds (not essential, particularly if anyone has a nut allergy!). Add a tiny amount of milk to ensure the mixture has a dropping consistency, then pour into your lined tins. Bake in the oven for about 50-55 minutes, until your knife pulls out dry when you test it. Leave it in the tin for now….

3. Mix together the lemon zest, and juice of the lemons with your demerara sugar, then prod holes all over the top of the lemon drizzle cakes and pour over the lemon drizzle, so that it runs into all of the little holes.
4. Allow the lemon drizzle cakes to cool in the loaf tins before turning out.

honeycomb with chocolate fondueFor more delicious #cookingwithkids fun try our honeycomb recipe golden syrup pictured here…

Oh, and I’m on twitter.com/MoreKidsChaos too… Instagram is my new favourite thing, Erm, and funnily enough on Facebook and Pinterest! Pop over to say hello x Like it? Pin it!

If you enjoyed this, check out an updated version with poppy seeds over on incredibusy.com

crafts, create, google+ hangouts, key stage 2, kids

spiral flowers newspaper

Fairy Tale crafts – taking inspiration from Snow White and the Seven Dwarves we decided to upcycle a charity shop mirror and create the famous Mirror Mirror on the Wall….

This was a fabulous team effort, and my son now proudly has this Fairy Tale Craft beauty hanging on the wall in his bedroom.

You will need:

Old sheets of newspaper
Cocktail stick
Glue stick
Stronger glue, (I recommend a glue gun!)

Instructions:

1) Roll the newspaper sheet diagonally from the corner, using the cocktail stick to get you started, so that the roll is nice and tight. When the cocktail stick starts to disappear inside the paper, gently pull it out, and continue to tightly roll the newspaper to create a long ‘stick’ – the first of MANY!

2) Flatten the ‘stick’ using a hard surface.

3) Taking your cocktail stick, start to roll the flattened ‘stick’ into a tight spiral, securing it with glue as you get to the end of the spiral.

4) When you have enough of these spirals, you can start to build up the pattern around the mirror – we found that the glue gun was the best tool for this!

KidsChaos-Mirror-paper-spirals-selfie

You could also spray paint the spirals, however we like the newspaper spirals in their natural form!

KidsChaos-newspaper-flowers

 Ali also blogs over on incredibusy.com and is a new lover of Instagram too… pop over and say hello! And I’ll be adding this to Lizzie’s#MagpieMonday as I love to salvage, upcycle and re-use stuff!

Fairytale KidsChaos RedTedArt Video

If you’d like to see more Fairy Tale crafts, firstly pop over to see our Jack and the Beanstalk Reward Chart, and then click the youtube link here, as I got together with Missie Lizzie who talked magic beans, Anthea with her elves’ shoes, Kelly talked Rapunzel, and Maggy at Red Ted Art (talking three little pigs) who hosted a Fairy Tale Craft google+ hangout.

Uncategorized

How Can The Weather Affect Skiing Conditions?

Is there anything more thrilling than a skiing trip?

There’s an undeniable romance in the idea of spending the day cruising snowy slopes on lofty Alpine peaks, before retreating to warmth and comfort of a log cabin and settling in beside a roaring fire.
That sounds perfect, right? For many, it truly is. However, the mountains can be dangerous places.

How Can The Weather Affect Skiing Conditions?  Photograph by Greg Rakozy
Photograph by Greg Rakozy

Conditions can be unpredictable and often extreme. Not only can this pose obvious dangers to a skier’s health and wellbeing, but the weather can also affect the quality of the skiing itself. You could be forgiven for thinking that all snow is the same and is fine for skiing either way. We’ve put together a guide to help dispel some of those myths. Keep reading to find out more.

Different types of snow

Snow can come in all kinds of different forms. From soft powdery snow to hard icy snow, to slushy, wet snow. The type of snow you encounter on the slopes can have a significant impact on your skiing experience.
If you asked an experienced skier, chances are that they would tell you that powdered snow is the best kind for skiing. Powdered snow is freshly fallen, untouched snow that offers a silky-smooth skiing surface. Powdered snow is preferred by experienced skiers as it allows them to generate speed quickly and easily, while its soft surface allows for more dexterous turns and fancy tricks. Beginners may also prefer to ski on powdered snow, it’s soft enough to act as a cushion if they were to fall.
Powdered snow that has seen a lot of traffic can turn hard and tough, this is known as packed snow. This might not be as enjoyable to ski on as powdered snow, but its strength and solidity can make for a more stable skiing surface.
It can be difficult to predict what kind of snow awaits you on the slopes. However, using a weather forecast platform like Piste Pro can give you an idea of how much snowfall is set to hit your destination of choice. Make sure to check it out before you set off on your trip.

The temperature

Obviously, it needs to be cold to snow. You don’t need to worry about that, you can be rest assured that it will be cold up on the mountains. However, particular temperature ranges can have an affect on skiing conditions, so it’s worth knowing what to expect.
Most experienced skiers report that the best temperature for skiing lies somewhere between -7 and -1 degrees Celsius. In this range, the snow will remain firm enough to ski on without melting or turning soft, while it will still be warm enough to enjoy a day’s skiing provided you are wearing the appropriate clothing.
Any colder and you could be in for a difficult time on the slopes. Clothes can only do so much, at low enough temperatures you’ll still feel the cold, and being out in these conditions too long can lead to serious consequences, such as frostbite.

Visibility

Visibility is crucial on a skiing trip. You’ll often be travelling at high speeds through treacherous terrain, being able to see where you are going is vital to avoid obstacles and other skiers. The sun can often affect visibility, reflecting off the whiteness of the snow and causing glare. Low cloud and fog can reduce visibility as well and make for dangerous conditions.

Conclusion

A skiing holiday can be an incredible experience. However, poor weather conditions can often turn a dream holiday into a perilous situation. Ensure you know what to expect and that you are aware of how the weather can affect skiing conditions.

This post is written in association with Piste Pro.

cooking with kids, crafts, gardening, gardening with kids

Bird Feeder Orange Half and Peanut Butter

DIY Bird feeder from half an orange

We have always been big ‘bird’ fans (no, not BIGBird, as in the Sesame Street character, although that has always quite amused…) – As a child we fed the birds in the garden at home, with various bird houses, structures and fat and seed balls, watching to see if the naughty squirrels had somehow managed to nab the grub before the bluetits could get to it!Bird Feeder Orange and Peanut Butter

Bird-Feeder-Peanut-Butter-ingredients-KidsChaos
So we wanted to share this easy birdfeeder with you –

you will need:

half an orange

some peanut butter

some bird seed…

string – (we love the baker’s twine!)

Bird-Feeder-Peanut-Butter-pierce-the-sides-KidsChaos

Scoop out the content of the orange (we have a smoothie every day, so we added the orange to that).

Spread some peanut butter into the orange skin, and add the seeds.

Pierce holes in the side of the orange skin ‘cup’ – actually do this BEFORE you add the peanut butter and seeds!

Thread string, and hang on tree…

We’ve also done this with a toilet roll – can you believe! Click here to read more and here for more fab bird feeder ideas.

Ali also blogs over on Incredibusy.com and is a lover of Instagram… pop over and say hello to us on @kidschaos_blog too!

travel, Uncategorized

Make The Most Out Of A Week In Johannesburg With These Useful Travel Tips

South Africa is one of the most exotic and action-packed family holiday destinations in the world. It comes with the promise of adventure and thrills. There are so many facets and sides to this fascinating country that for the first-time visitor, it can be hard to know where to even begin.

If you’re planning to visit the nation’s capital Johannesburg, you’re no doubt brimming with a mixture of excitement and nerves. It’s a city that’s often spoke of in legendary tones, it is rich in history and steeped in culture. If you’re heading there for a holiday and you’re not quite sure what to expect, check out our guide with the top tips for spending a week in Johannesburg.

Unsplash photo from
Kwena Mashale

Be on your guard

Johannesburg has long held a reputation for being a city awash with crime and social problems. While the city certainly has a checkered past, it’s no more or less dangerous than many other major metropolitan hubs. That being said, you must remain vigilant at all times. Criminals anywhere see tourists as easy and attractive targets, both for their unfamiliarity with the local area and for their habit of carrying around valuables like cash, passports, or cameras.

Busy areas like the city’s main train station, Park Station, can be hotbeds for pickpockets and thieves. Keeping your valuables in a money-belt secured under your clothes can be an effective way of protecting them from pickpockets.

Before you set off, ensure you’re covered with a travel insurance policy. For example,  a travel insurance company like Staysure will cover you if your valuables are lost or stolen, as well as offering cover for cancellations, lost baggage, or medical expenses.

Where to stay

Johannesburg is an enormous city, with a metro area population of 6 million, it is the largest land-locked city in the world. It is made up of several distinct neighbourhoods and areas, each with their own unique characteristics and quirks. Where you choose to stay will depend on the type of holiday you’re looking for.

Rosebank and Melrose are probably the cities safest areas, perfect for a relaxing holiday with no worries. If you’re looking for a little more culture, consider staying in Bryanston or Randburg, there you’ll find plenty of stores, coffee shops, restaurants, and museums. 

For younger people looking for something cooler, Maboneng is trendy neighbourhood with art installations, live music, and rooftop bars.

The language barrier

You will find English speakers in South Africa. However, you’ll also encounter many more dialects, as the country has an incredible 11 official languages. The most common of these are Zulu, Xhosa, and English, so it will be worth your while learning some words and phrases before you head off.

nomvula-moepya-botanical gardens Johannesburg via unsplash
Botanical Gardens (Nomvula Moepya)


Using the native language will help endear you to the locals in the area. It will demonstrate that you’ve made an effort and that you are appreciative of their hospitality, you should be pleasantly surprised to see that effort returned in kind.


Conclusion

Johannesburg is a city with many sides. It has been somewhat unfairly maligned in the past, deemed an unsafe, dangerous place where walking the streets is not advised. While, like any major city, it does have some riskier areas, there is so much Johannesburg can offer no matter what kind of holiday you’re going on. To make the most of your time there, choose the best neighbourhood to stay in, learn a few phrases in some of the many local languages, and be aware of your surroundings to guarantee yourself a memorable stay.

crafts, father's day, FREE printables, kids

How about a Tin Can Savings Tin?

With Father’s Day looming, we decided to do something a bit different for Dad and as one of his foibles is collecting coins. *Saving* £2 coins in piles around the house, particularly on shelves… So we came up with a genius tidy-up plan…tin can fathers day savings

We decided to tidy up the favourite shelf for Mr.KidsChaos, our bedroom mantle piece.To assist with the tidying, we made him some Savings Tins, and they look nice too don’t you think?

Can we call this photo a #Shelfie?
Our bedroom ‘Shelf’ is often very cluttered, with our favourite wedding pressie painting from Jill Barker & Jonathan at Middlewick, and the odd pair of his daft colourful sunglasses. His collection of coins tumble constantly, as they get knocked and fall to the floor and it makes me go a little crazy!!

FREE printable tin can printThe kids decided he needed somewhere to save his £2 coins, and told me what the text should read on the tin cans. They picked the colours, and I designed the graphics. Bonus is, you can print these off and do the same thing too, for FREE!

Simply print them off here, and trim them out, and glue them on to your clean tin cans.

Don’t tell him, but I often BORROW the odd coin when we’re dashing off to Martial Arts club, or Cubs…. Sssh, he never reads this anyway, he’ll NEVER know. Perhaps if he saves enough, I could BORROW some of it for a bit of Bathroom DIY…watch this space!

For more FREE printables for tin cans, click here for a fun game for the summer – kick the can.

For more FREE Father’s Day Printables, try our Monster Truck card and Jigsaw Puzzle Cards.

And other uses for bean tins, and soup cans can be seen over on A Greener Life For Us, using up old paint to make plant and pencil pots click here.

Oh, and I’m on twitter.com/MoreKidsChaos too… Erm, and funnily enough on instagram, Facebook and Pinterest! Pop over to say hello x Like it? Pin it!

Ali also writes over on AGreenerLifeforus.com

cooking with kids, crafts, create, education, gardening with kids

Make a Natural biodedegradeable Dream Catcher
Dream catcher natural and biodegradable

Making a Dream Catcher using natural, found objects and at the same time ticking the boxes of three STEAM (Science, Technology, Engineering, Maths and the Arts) practices:

The Science (making dough with salt, water and flour for the beads)

The Arts (designing and sculpting the salt dough leaves, and assembling your dream catcher)

The Maths (geometry of weaving a pattern with a single length of twine)

Dream catchers with organic cotton yarm and hand made salt dough beads
dream catchers, with natural cotton yarn and handmade salt dough beads

This is such a fun project. And one that you could do either indoors or outside in the warmer weather – we really love a craft that all ages can enjoy – and this three sides dream catcher can be a bit of a challenge when it comes to the weaving, so we will link some YouTube tutorials at the foot of this article so that you can get acquainted with the dream catcher weaving geometry at your leisure.

Before you get started, make sure you have everything you need for your beautiful natural dream catcher – go on a nature hunt, look for feathers, acorns, pine cones, and lots of sticks!

sticks

You’ll need some cotton string, or strong yarn, and we also made some colourful salt dough beads and ‘leaves’ so that everything is biodegradable – this means you can eventually hang your dream catchers outside in the garden or the woods, for them to let nature decay them – hey, that may even be a bit of a science lesson right there too!

Salt dough leaves and beads recipe

  • 1 part salt
  • 2 parts plain flour
  • half to one part water
  • optional – some natural food colouring (if you are feeling ambitious – you could go as far as making your own dough dye with beetroot! hey – experiment, have some fun)
home made salt dough beads

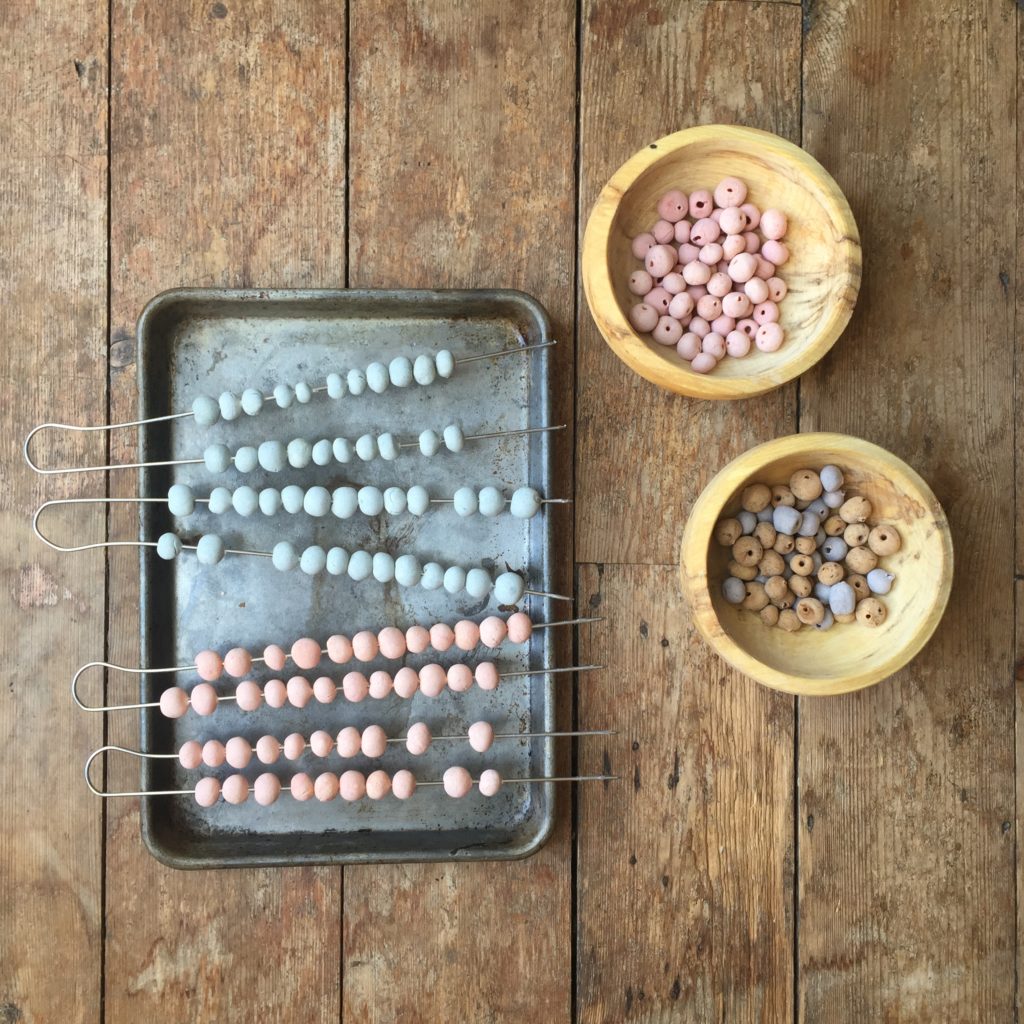
We mixed the dough into three bowls, and added three colours – subtle so that they would blend well with nature – and rolled small balls, pushing a skewer through to make a bead, we dried the beads by ‘stringing’ them onto metal skewers and propping up off the baking tray to harden in the oven on a very low 100 degrees temperature, checking on the beads after about fifteen minutes, and turning them on the skewers so that they didn’t stick.

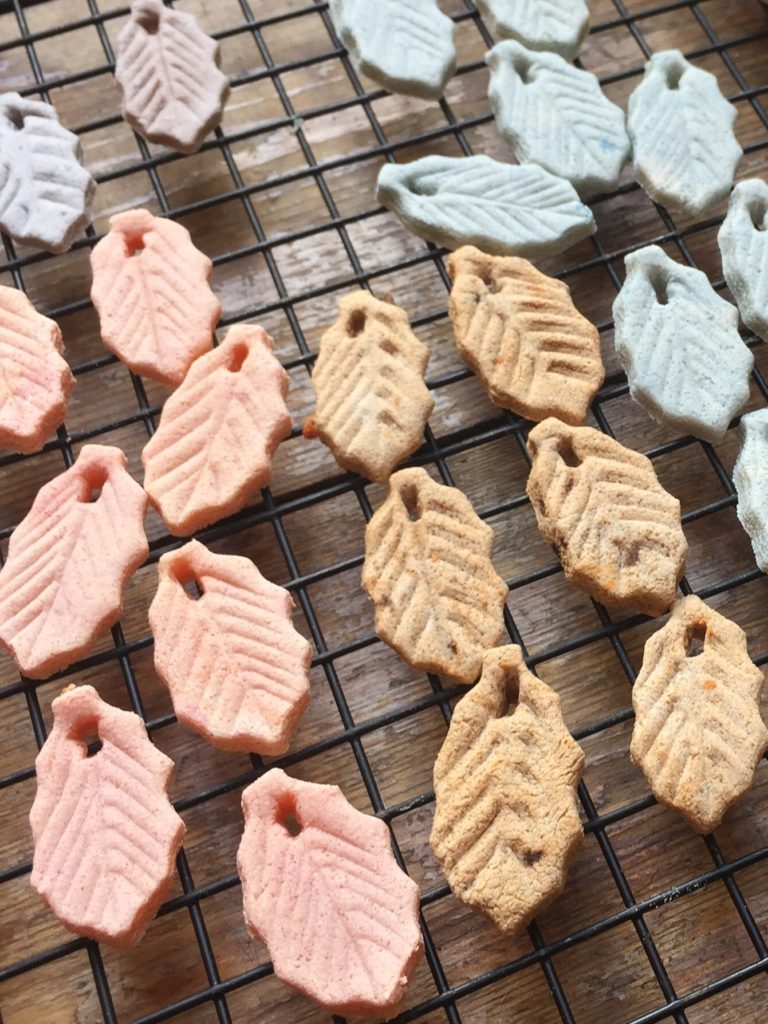
The leaves we made by rolling the dough out to about 5mm thick, and used a leaf shaped cookie cutter and a knife to score the marks on the ‘leaves’ and push a hole at the top of the leaf to allow it to be attached to the dreamcatcher. Again, we allowed these leaves to harden, baking them at the bottom of the oven, for about half an hour to an hour, using a cooling rack from the kitchen. We made these beads and salt dough leaves in advance of our dream catcher construction to allow them to harden – word of warning – don’t let them get damp, they will go soggy!

The assembly of your dream catcher

Now you have everything you need, start to pull it all together. Make a triangle from three sticks of the same length, tying them tight in each of the three corners.

Make a ‘bobbin’ with one short stick, about 4cm long, wrap the yarn around and around until it’s full of yarn – (you’ll have to experiment, but you’ll need enough yarn to create the geometrical pattern on the dream catcher ‘web’).

Using the yarn on this bobbin, start by tying a knot next to one of the three corners of the triangle frame.

Get weaving that web

As you start to ‘weave’ your web the first row can be quite loose.
Evenly spaced, start to work the yarn around the triangle:

  1. Pass the end of your yarn around a stick.
  2. Bring the end under the straight part of the yarn.
  3. Bring the end up and pass it through the eye of the loop you just made.
  4. Pull it tighter to complete a half hitch.
  5. Tie the hitch the same at each intersection of the yarn.
  6. Continue around the triangle, to ‘row two’ in the same way, see diagram (and the video links below)
  7. The next hitch is made at the midpoint of the first loop in the first row.
Weaving the web on your frame of sticks

As you tie these hitches you start to pull each stitch in the web a little tighter. Continue around the web tying a hitch and pulling tighter on each row until you are down to a small centre hole in your web. Tie it off in a knot.

Now tie three strands of yarn from the ‘bottom’ of the triangle and attach the beads, feathers, leaves – And tie a hanging loop at the top of the triangle and you are ready to decorate the trees by hanging your wonderful dream catchers in the forest – or, if you REALLY want to catch those dreams in your web, hang your natural dream catcher up in your bedroom for a real conversation starter!

We would love to see what you create – do tag us on Instagram where you will find our new account https://www.instagram.com/kidschaos_blog/ use the hashtag #31DaysofLearning as we are joining in with KiddyCharts creative STEAM project this month.

Ali also writes over on incredibusy.
Cotton yarn: Wool and the Gang.
Shoot location: fforest, during the fforest gather workshops.

Tap here for a YouTube tutorial of the weave