Uncategorized

Ethical grown up Christmas gifts

Always the romantic {for romantic, read ‘procrastinator’}, I do tend to leave my Christmas Shopping to the last minute, so along with sorting my tax returns, I promised myself that I’d get cracking and get both things completed BEFORE the end of October… How about that?!

Tricky thing is, I keep seeing things I’d like for MYSELF – but don’t they say that that’s a sign of a good pressie? My sister’s Christmas gifts from me, are always identical to the ones I’ve treated myself to… funny that!

So lets start with Christmas gifts for myself, I’ve discovered this website in Brooklyn, which has more or less everything in one section with my name on it, click here to have a look – It’s right up mine, and my vegan sister’s, street…  called www.uncommongoods.com, it’s a lovely privately-owned store which features unique designs and hand-crafted gifts created “in harmony with the environment and without harm to animals or people”.

cookbook iPad holderWell, as one who ALSO allegedly is trying to get more organised with meal-planning, I would treat myself, coughs, I mean my sister, to this rather lovely reclaimed wood cookbook stand here to prop my (her) iPad when browsing for recipes

Next, (another one of those, “oh, I really need those” pressies) – I LOVED the idea of these magnetic bike lights here – having cycled back from a PTA meeting in the dark last night, genuinely, I SO need some bike lights I can pop in my pocket, with no fiddly faffing to attach them to my bicycle!

Magnetic Bike LightIn fact, there were LOADS of fab, not explicitly gender-specific ‘Christmas gifts for women’ here, which really pleased me as someone who gets so annoyed to see the stereotypical girlie gifts – very heartening thank you uncommongoods!

And on that point, fair enough, the Christmas Beard Oil might best sit in this ‘Christmas gifts for men section’ enough said on that…

Having older parents and in-laws, we know too well that (A) we’ve completely run out of ideas for things to get them for Christmas (if they are anything like mine, they are slowly clearing their own houses of clutter and gifting you all sorts of curious pieces of crockery and randomness from their lives). 

My life story journalAnd (B) Their favourite subject for conversation is the good-old-days – Getting this recorded is often tricky, and encouraging them to do so with this wonderful ‘my life story’ journal will hopefully furnish their ancestors with all sorts of amusing stories and revelations! A fab gift for my Father in Law if ever I saw one!
http://www.uncommongoods.com/product/my-life-story-so-far 

Made by hand, as with more than half of the product uncommongoods sell on their website, this is a beautifully handcrafted journal.

So only another two weeks to get that Christmas list sorted, I see a large parcel winging its way to us soon!

Ali also blogs over on aGreenerLifeforus.com and is a new lover of Instagram too… pop over and say hello!

crafts, create, google+ hangouts

T Shirt Yarn Pom Pom

T Shirt Yarn Pom-Pom

We’ve all of us got an old T-shirt lying about don’t we? I had a very favourite, Breton Stripe T which had sadly come to the end of its life, and was just to scruffy to go to the charity shop, so we decided to DO something with it, and as we’ve gone a little pom-pom crazy this month, thought we’d have a go at the old classic – a T Shirt Yarn Pom Pom!

So, you could use a big pom-pom maker, or, like us, grab a couple of ‘donuts’ of cardboard, and have a go…

Step 1 – using a mug as a template, we cut two circular donuts, and lay them on top of each other.

Step 2 – cut your T-shirt into long strips to make ‘yarn’ and lay one piece of this yarn between the two donuts.

Step 3 – Wrap the T-shirt yarn around and around the donuts, and tie off the centre strip of yarn in a knot.

Step 4 – Push your scissors between the two donuts and snip around the circle as you would a regular pom-pom!

T Shirt Yarn Pom-Pom

We love how this one turned out and will be collecting our old T-shirts to have a go and MORE T Shirt Yarn Pom-Poms soon!

If you liked this post you might like to click here for FULL HOW TO instructions on making paper pom-poms

If you have a thing for giant paper pompoms, click here to see our crepe paper version, with raindrops!

Ali also blogs over on aGreenerLifeforus.com and is a lover of Instagram too… pop over and say hello!

Uncategorized

FREE printable Witches hat patternwitch's hat template
witches hat template 1 - 4
1) Cut two ‘doughnut’ shaped rings (we draw around a tea plate) alternatively, you can print this page out twice! this will be your brim. 

2) and 3) Fold the circles in half gently andcut out the centre of the circles (we used a coffee mug as a template)

4) Using a dinner plate as a template,cut out about 3/8ths of the circle to create a ‘curved triangle’ which will be the cone shape of the Witch’s hat) (see page 2 of the attached PDF for template) Cut slits about 1,5cm up into the curved edge of your ‘triangle’

witches hat instructions5) and 6) Pop cone into the 1st doughnut, and turn back the slits and glue to the underside of the brim.

7) Glue the second doughnut shape to the first brim to make it look like a nice tidy witch’s hat!

You can add elastic to the hat to make a little under the chin strap to hold the hat on to your head, or if you are using on the paper pom-pom we’ve made here, push the string through the top of the hat, the cone will have left a small natural hole in the very point of the witches’ hat.

Halloween-witches-hat-template-page-1-and-2-Kids-Chaos-1Click here >> to download your FREE printable Halloween witches hat template page 1 and 2 © KidsChaos.com it’s a fab witches hat pattern! and here for the Witch Pom pom face

If you have a thing for giant paper pompoms, click here to see our crepe paper version, with raindrops!

Ali also blogs over on aGreenerLifeforus.com and is a lover of Instagram too… pop over and say hello!


Uncategorized

Halloween Witch Paper Pom-Pom FREE printableWitch-Halloween-Pompom-Kids-Chaos

We got a bit carried away with Halloween preparations this year, and 11yo wanted to have a go at making some scary spooky Witches – So he drew these scary eyes, crooked nose, and toothy grin for the witch’s face and we stuck the on to the paper pom-pom – how cool is this! The Witch’s hat is pretty easy to make to, follow our simple instructions here….
halloween witch face templateReally easy witch’s face – have a go by clicking here for our FREE downloadable template just print off, and cut out the shapes, in fact, print two, and use one as a template for your pumpkin this year too!!

step-1-4-make-a-paper-pom-pomclick here for FULL HOW TO instructions on making the paper pom-poms

12 simple steps – really easy to follow, our kids have been making them in ALL sorts of colours – we’ve even mixed up different shades of green here…
If you fancy having a go yourself click here, note – save the trimmings from step 4, we used them for the Witch’s hair!!
Alternatively you can purchase them here at Delights in packs of three!

Free printable halloween witch’s face, just attach to giant paper pom-pom or use as a template to carve your pumpkin!

If you have a thing for giant paper pompoms, click here to see our crepe paper version, with raindrops! and here for a Pumpkin Free printable template.

Ali also blogs over on aGreenerLifeforus.com and is a lover of Instagram too… pop over and say hello!

crafts, create, halloween

HOW TO make paper pom-pomspaper pom-pom clouds

We posted a link to one of our most popular instagram pictures a few month’s ago – these crepe paper pom-pom clouds, with button raindrops which had everybody gasping with delight – and didn’t get around to actually posting a full how to, so here we go… (you can see why it took so long to post a ‘how to’ – LOTS of photos!)

step-1-4-make-a-paper-pom-pom

1, 2) Concertina fold 8-10 sheets of tissue paper
3) Tie a length of string to the centre of the folded paper
4, 5) Trim the two ends of the folded concertina paper in a curve (keep the off-cuts, you never know when you might need them!)

step-5-8-make-a-paper-pom-pom
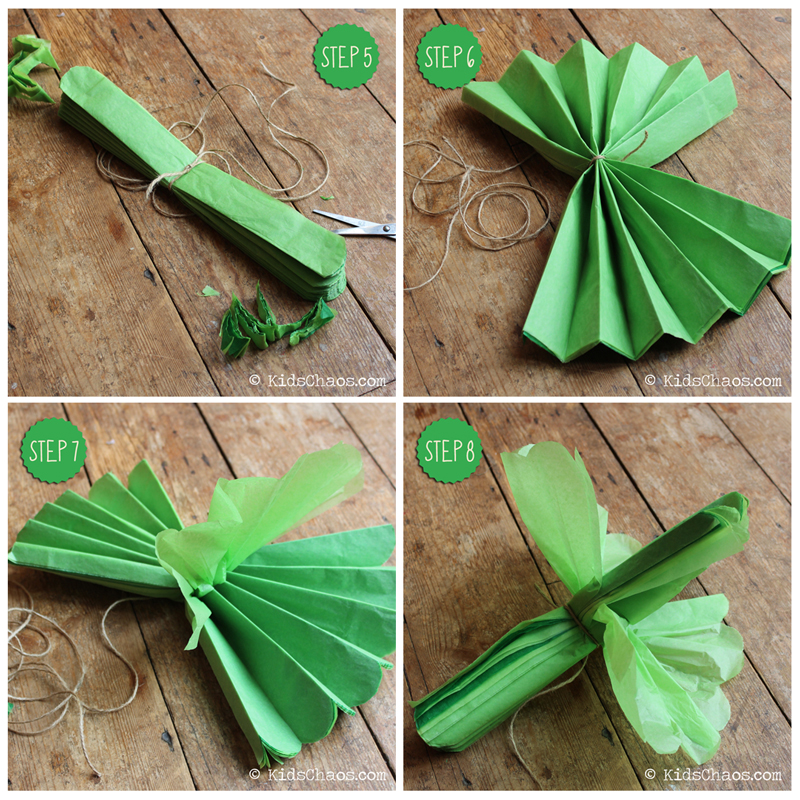
6) Fan the pom-pom out flat as it will go
7) Pull up one thin sheet of tissue paper at 90 degrees
8) Pull out the opposite sheet of tissue paper, at 90 degrees

9) Rotate the tissue paper pom-pom and pull out opposite sheets of the paper
10) Keep pulling and fluffing the single sheets of tissue paper to create the paper pompom.

step-9-12-make-a-paper-pom-pom

and that’s it! – to see how you can create something quite amazing to hang in your bedroom, click here to see our crepe paper version, with raindrops!

If you fancy having a go yourself click here, alternative you can purchase them here at Delights in packs of three!

Ali also blogs over on aGreenerLifeforus.com and is a new lover of Instagram too… pop over and say hello!

crafts, create, education, key stage 2, kids

Papier Mache Disaster Meteorite

So, we decided to make some Papier-mâché hot air balloons… that’s how it started out, all good intentions.

So 7yo being the possibly more crafty of the two (yep, the 5yo is crafty in other ways, say no more) got stuck right in….

KidsChaos PaperMache age 7 bowl
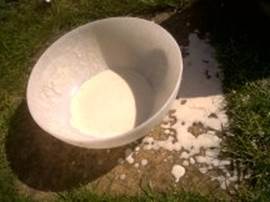
1) We made the glue: mixed one cup of flour, and two cups of water, and a teaspoon of cinammon (that way it smells nice too)

KidsChaos PaperMache newspaper age 72) We ripped the newspaper into strips

3) 7yo took off his brand new hoodie as he didn’t want to get it mucky

KidsChaos PaperMache planet age 7KidsChaos PaperMache disaster age 74) We pulled each strip through the ‘glue’ and let it drip back into the bowl (AND all over the garden too, much to SAHD’s delight)
5) We layered and layered until the balloon (Oh, I didn’t mention that bit did I? – blow up a balloon, and balance it on a bowl to stop it blowing or rolling away) was covered in paper mache.

Then we had to leave it to dry for a day (which is where 5yo lost interest, so I’d say stick with one layer if you’re not bothered about keeping the masterpiece for ever!)

KidsChaos PaperMache disaster meteorite age 7
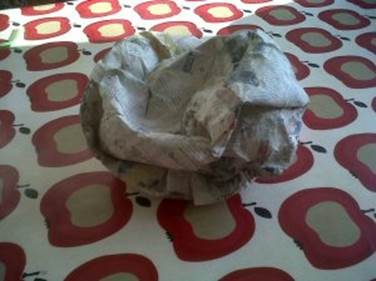
We learnt an important lesson here, on Day 2 when we went back to add another layer, 7yo’s balloon had shrivelled, but we layered on some more paper mache…. MISTAKE, with no balloon inside to hold it’s shape this happened…

Not to be out-witted by the wilted balloon, 7yo spun it round (phew, was waiting for a tantrum) and said he would make it into a meteorite – which is what he did! Job done…

Thanks to Maggy at RedTedArt for continuing to encourage us to ‘get crafty!’

For a more successful foray into papermache check out our post here on Paper mache seed pots – using the blender! and using pulp from cereal boxes … this time it worked!paper mache seedling pots

Follow Ali on twitter as @incredibusymum and twitter.com/MoreKidsChaos for more posts like this one… Erm, and funnily enough on Google+Facebook and Pinterest! Pop over to say hello x Like it? Pin it! and come say hello at instagram.com/incredibusy too x
Ali also writes over on AGreenerLifeforus.com
cooking, cooking with kids, food, kids

Quick Pizza with White Beans, Garlic and Rosemary

Pizza stage 1 Bean-Garlic-Rosemary-KidsWe do like a quick pizza on a Friday, or a playdate night at our house!

When we make our pizza base mixture in the bread maker, we always make double quantity and freeze them in small balled portions…

Perfect – so this morning, I took four of these portions out of the freezer, popped some flour onto a plate and place each of the frozen balls onto the plate to defrost for the afternoon.

Both boys like a different pizza topping, this is 11yo’s as he’s not so keen on cheese and tomato (what?!) – you’ll see he’s moved the mozzarella into one slice size just for me!pizza with bean garlic rosemary

Ingredients (for two)

2 pizza bases (either buy them ready made, use flatbreads, or follow the instructions for the pizza setting on your breadmaker)
Slosh of olive oil
2 large garlic cloves
400ml water
2 tins of beans – we used chick peas, although very nice with cannellini beans
Couple of sprigs of rosemary
1 ball of mozzarella
Handful of olives and capers
Salt and pepper

Directions for this quick pizza

Heat oven to 240ºC.
Chop the garlic, and fry gently for about a minute in the olive oil, adding the white beans, and the water, turning up the heat and simmering. Pour the beans, garlic and water into a small blender and whizz up, leaving some beans (or chick peas in this case) partially whole. Add a little water, and stir, seasoning this puree with salt and pepper and spread.

Spread the puree over both pizza bases, chop up the olives in half, and sprinkle them with the capers over the pizzas (not too many, as they are both super salty).

Rip up the mozzarella and drop onto the pizza bases (not essential, tastes good without if you’re not fond of cheese!)

Drizzle over the olive oil, and scatter the torn rosemary and pop in the hot oven for 10 minutes. Enjoy your ‘quick pizza’… 🙂

Follow Ali on twitter as @incredibusymum and twitter.com/MoreKidsChaos for more posts like this one… Erm, and funnily enough on Google+Facebook and Pinterest! Pop over to say hello x Like it? Pin it! and come say hello at instagram.com/incredibusy too x
Ali also writes over on AGreenerLifeforus.com


crafts, create, gardening, kids

A quick blog post to share with you the wonder that is camping… and the sort of crafts you can do whilst you are stuck in a Pine Forest in #FrenchFrance and the boy’s pineapple pinecone.

Pinecone Pineapple
We go on holiday every year with some lovely family friends, and as the kids get older, they get more and more feral, and tend to take themselves off in packs, doing their own thing, whether it comes to popping to the camp playground to make new friends, or getting crafty with the paints and pencils we still take with us every year… So it was with much delight that I found this Pine Cone Pineapple creation by our eldest, he liked it so much he posted it onto his new ‘now I am going into Year 7 please may I have an Instagram account?’ instagram feed….

Pine forest

It was a very visually inspiring place it has to be said… with the largest sand dunes in the World on our doorstep in a pine forest at the foot of the Dune de Pyla. You just had to look UP and the view was pretty awesome too… Look at those leaves!

Follow Ali on twitter as @incredibusymum and twitter.com/MoreKidsChaos for more posts like this one… Erm, and funnily enough on Google+Facebook and Pinterest! Pop over to say hello x Like it? Pin it! and come say hello at instagram.com/incredibusy too x
Ali also writes over on AGreenerLifeforus.com
crafts, create

Frozen Crown Craft – paper cup craft

Frozen Crown – paper cup craft

We’ve said it before, paper cups are a great asset to a store cupboard…And for no other reason that they can be VERY handy to have around for that impromptu Frozen Crown making session – what better way to spend an afternoon, making paper cup crowns, and then sitting down to watch the Frozen film on DVD!

Stage 1 Paper Cup Crown

You will need:

Paper cups
Scissors
Pom-poms
Glue
Alice band

Instructions:

1) Cut a series of triangles around the rim of the paper cup.

2) Turn the cup to sit on it’s base, and glue the pom-poms onto each point of the triangles.

3) Using the scissors, push two holes into either side of the base of the paper cup.

4) Thread the Alice band through the holes, and WEAR with pride! (seen here modelled by our Italian student Marta!)

Stage 2 Paper Cup Frozen Crown
Paper Cup Frozen Crown

Paper Cup Frozen Crown

For more quick and simple paper cup ideas, check out our W is for Whale and Red Ted Art’s pom pom party poppers!

Follow Ali on twitter as @incredibusy and twitter.com/MoreKidsChaos for more posts like this one… Erm, and funnily enough on Google+Facebook and Pinterest! Pop over to say hello x Like it? Pin it! and come say hello at instagram.com/incredibusy too x
Ali also writes over on incredibusy.com
Uncategorized

Kid’s Birthday Presents: Top Budget Ideas

It’s easy to get a little carried away when it comes to buying presents for kids, particularly when you’re their parents! It’s bad enough when it’s somebody else’s child that you’re buying for, let alone when it’s your own flesh and blood that you’d love nothing more than to spoil rotten. However, our finances don’t always mean we can do that and, when we have a budget to stick to, we have to be that little bit more careful about where our money is going. From boy’s pyjamas to hair clips and slides, here are some budget ideas for when you’d like your money to go as far as possible.Loombands

Books

Can kids ever have too many books? The answer is…no! Books are a great way to encourage reading at home – whether it’s reading by themselves, or sitting with you for a bedtime story. You can enjoy all manner of books for a few pounds, from authors including Julia Donaldson, Jacqueline Wilson and the like. Take a look at the book charts and pick a book or two that is suitable for the child’s age.

DVDs

Children’s DVDs are cheap as chips these days, and the variety on offer is out of this world. Help the child in question to build their film collection with one of the latest releases, such as Frozen, Turbo or the latest in the Tinkerbell franchise, The Pirate Fairy.

Pyjamas

Every kid needs a few sets of cool pyjamas, no matter what season we are in. George’s boys pyjamas are a great example of affordable, but funky, sleepwear and the girl’s range is fabulous too! Choose your child’s favourite character PJs, such as Skylanders, TMNT or Adventuretime, and who wouldn’t fall in love with Tatty Teddy, Doc McStuffins or timeless fave, Hello Kitty.

Arts & Crafts

Any parent of school-age children will know that the latest craze to hit the schoolyard is Loom Bands, and what better way to fuel this addiction than with a couple of sets of them? Perfect for any girl, or boy, who loves to loom, you can choose from a range of coloured sets, as well as glow in the dark, scented and glitter bands.

Alternatively, arts and crafts including paint sets, ceramics, kits and even flower presses are great ways to peel the kids away from computer games and into something that is engaging, fun and creative.

Jewellery & Hair Accessories

Beads, jewellery and hair accessories are great ways to bulk out a birthday present without spending a fortune. Headbands, bobbles, bows, slides, bracelets, necklaces – great gift ideas, the kids will be chuffed with any of these and they cost next to nothing!

Sticker Books

Sticker and activity books provide a perfect present idea for kids, and they don’t cost a lot either. From Marvel inspired to princess handbags, sticker and activity books help to keep them busy on rainy days while also encouraging them to use their knowledge to solve puzzles.

Here are a few ideas to help inspire you – if you’re still not sure what you wish to buy the birthday girl or boy, head to the high street or your local ASDA to see what great value goodies are available for you to splash your cash on.

This is a sponsored post