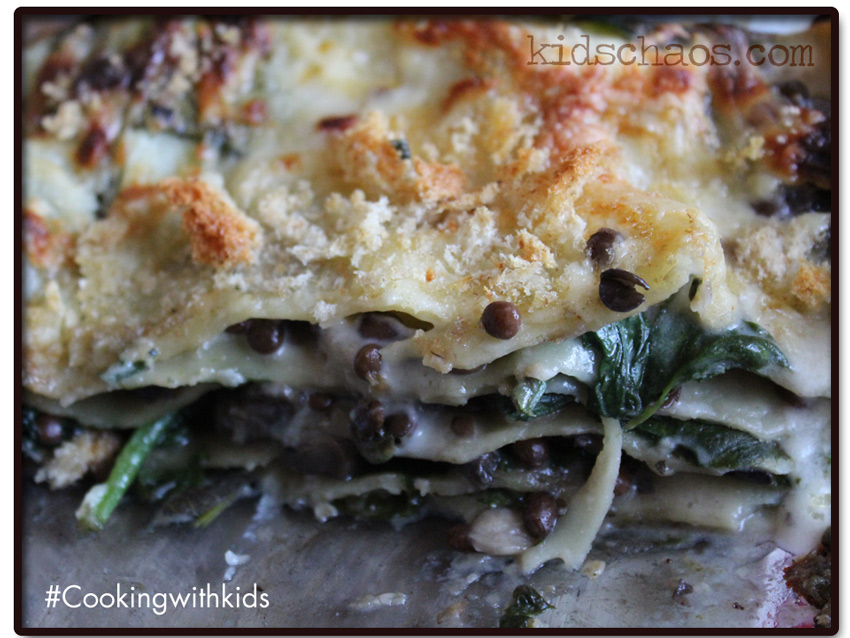
cooking with kids, food

honeycomb recipe with chocolate fondueYou’ve always wondered how to make honeycomb right?

So 9yo has searched out the crunchie honeycomb recipe for us, and he made this honeycomb last night after a week of nagging to buy Bicarbonate of Soda and Golden Syrup! (be careful, it gets super-hot)

Honeycomb recipe let’s go!…(start by lining a cake tin with some greaseproof paper)

Then, melt the Butter (80g) Caster Sugar (160g) and Golden Syrup (80g) in a pan over a low heat. When melted, whack the heat up and it’ll start bubbling like crazy. Shake the pan (don’t stir; just like James Bond’s favourite cocktail) and you’ll see it start to darken, as it bubbles away – sprinkle your Two Teaspoons of Bicarbonate of Soda over the bubbles, and whisk for about ten seconds, before pouring the honeycomb mixture very carefully into your prepared dish to set. Let it sit, don’t move it or the air will drop out (and it’ll go flat!).

Instagram screengrab of Tate and Lyle tins for honeycomb recipe

When it’s cool, pop it in the fridge to set. Take photos and post on instagram…for people to click the little heart and make you happy…

KidsChaos honeycomb recipe closeup

Meanwhile, melt some chocolate in a bowl with a splash of milk, 30 seconds in the microwave, and when the crunchie crunchy honecomb has set, bop it with a rolling pin, and dunk it in the melty melty chocolate dip…. nice 🙂

Your very own chocolate fondue…This could be a great playdate activity, always fun to include the children in your kitchen activities, and a bit of a science experiment too… How does the Bicarbonate of Soda Work? It’s an alkili which gives off carbon dioxide which expands the mixture.

(now brush your teeth)

Oh, and I’m on twitter.com/MoreKidsChaos too… Erm, and funnily enough on Facebook, Instagram and Pinterest! Pop over to say hello x Like it? Pin it! I also write over on aGreenerLifeforus.com – you’ll find more delicious chocolate recipes there…

baking, cooking with kids, crafts, food, google+ hangouts

Valentine's Day Pie

So we have frozen plums and frozen pastry in our freezer = The Perfect Plum Pie recipe for Valentine’s Day!

We’ve been practicing for Valentine’s Day at our house this week… and reminiscing on last year’s Valentine’s Day cake, where we used a small heart-shaped cookie cutter, and some ready-roll-out icing to decorate Daddy’s cake – we came up with the perfect idea, ready-roll-out pastry, and a heart-shaped plum pie of course!

Hearts cut from the pastryHow to:

Using the frozen plums from late summer’s picking frenzy, we warmed them from frozen in a saucepan with a tablespoon of sugar, when the plums start to thaw, strain the juice into a cup (to use later as a sauce if you like), and pour the sugary plum mixture into the plum pie dish (we have a heart-shaped cake tin, perfect for many occasions!) Meanwhile lay the pastry over the plums, and crimp the edges, cut off excess with a sharp knife, and use that excess for your little hearts. to:

Valentine's Day Plum Pie recipe heartsBrush the pastry with a beaten egg, and add the little hearts in whatever pattern you like, the egg will help them stick to the pie, don’t forget to brush the hearts with the egg glaze too, and for extra sweetness you can sprinkle some course sugar over your plum pie. Bake for about half an hour, or in our case, until the plum pie crust starts burning!

If a Plum Pie recipe is not your thing, try our Cake in a Mug, click through to Ali’s other blog aGreenerLifeforus.com

redtedart-hangout-valentines-day For more Valentine’s Day inspiration, try my easy to make hand in heart cards, and FREE Printable jigsaw puzzle piece crafts Valentine’s greetings cards and check out our Google+ hangout hosted by Red Ted Art, featuring  Kelly from domesticgoddesque.com with her glitter heart cake toppers Lizzie with her  missielizzie-meandmyshadow.blogspot.co.uk rustic twig heart wreaths and her silver birch bark candle – amazing… Plus Anthea’s needle felt hearts and Maggy’s collection of Valentines Day craft ideas.

Oh, and I’m on twitter.com/MoreKidsChaos too… Erm, and funnily enough on Facebook and Pinterest! Pop over to say hello x Like it? Pin it!

cooking with kids

The boys cooked this themselves tonight…
KidsChaosCookingWithKidsSalmonPakchoiWith my shoulder still out of action, and my arm in a sling for the second month… (long story, fell of my bike) – the boys have been doing a LOT of cooking themselves. This one is easy, quick and very delicious, so I’m quickly writing it up to share with you… (and so that they can find it again for the next time they make it!)

Preheat the oven to 200°C. Mix the olive oil, soy sauce, chopped ginger and garlic in a small bowl and mix together. Season with salt and black pepper.

Ingredients

1 tablespoon olive oil
1 tablespoon dark soy sauce
5 cm fresh root ginger, peeled and finely chopped
2 garlic cloves, finely chopped
4 salmon fillets
2 pak choi, quartered lengthways
200g mushrooms, (we used Oyster Mushrooms – grown from our own espressomushroom.co.uk box!
pinch salt
pinch ground black pepper

Place salmon fillets, the pak choi, and mushrooms on a roasting tin, then ‘dribble’ (their words, not mine) over the garlic and ginger mixture. Pop into the oven to roast for 20–25 minutes. Serve with brown rice.

nice.

To read more about our mushroom growing, click here

Oh, by the way, I’m also on twitter.com/MoreKidsChaos too… Erm, and funnily enough on Google+Facebook and Pinterest! Pop over to say hello x LIKE IT? Pin it!

baking, cooking, cooking with kids, halloween, kids

toffee apples

I used to LOVE Toffee Apples as a kid, well, I SAY that, I do seem to remember just eating the toffee, and discarding the bit with the vitamins… My boys on the other hand, food-swots that they are, love getting through the toffee to the yummy healthy apple centre! So I thought I’d share the recipe we use with you, just in time for Halloween and a few fireworks for Bonfire Night here in the UK!

you will need:

  • 6 medium sized apples
  • 200g golden caster sugar
  • 2 tbsp golden syrup
  • half tsp vinegar
  • 50ml water
  • Sprinkles (optional)

1) Pop the apples into a bowl of boiling water to remove the waxy finish, rub them dry with a tea towel, this allows the toffee to adhere to the apples. Push a wooden lolly stick into each apple.

2) Lay a sheet of greaseproof paper onto a plate beside the stove, and space the apples on this so they do not touch each other. I sprinkled some ‘hundreds and thousands’ onto the paper first, you don’t NEED to do this… looks pretty though 🙂

3) Pour the sugar into a pan along with 50ml water and set over a medium heat for five mins until the sugar dissolves, then stir in the vinegar and syrup. If you have a sugar thermometer (I don’t), pop it in the pan and boil to 140C or ‘hard crack’ stage. I find after about ten mins, you can test the toffee by pouring a little into a bowl of cold water. It should harden instantly and, when removed, be brittle and easy to break. If you can still squash the toffee, boil it for a tiny bit longer…

4) Next bit – act fast! Dunk the first apple into the pan, swill the toffee around so it’s fully coated, allow excess to drip back into the pan, and then place the apple back into its spot on the greaseproof paper, careful not to bump it into the other apples…

Obviously let them cool down well before eating, as the toffee is SUPER hot, and if you have any toffee left over, poor onto another sheet of greaseproof paper (with a lip so it doesn’t run) and the kids can have fun cracking it with a rolling pin when it’s cooled and set!

To keep the theme of apples going, and inspiration for a slightly healthier option, try Domesticgoddesque’s baked apples – Or try Lifeatthezoo‘s baked apple version and then, to go with your bonfire night treats…how about the Red Ted Art’s edible sparklers

Oh, by the way, I’m also on twitter.com/MoreKidsChaos too… Erm, and funnily enough on Google+Facebook and Pinterest! Pop over to say hello x LIKE IT? Pin it!

cooking with kids, kids

benihana-kidschaos

In the name of research (coughs), for good places to take the family for supper, I had a grown-up night out, hosted by the lovely Laura @LondonBabyMum founder of London-Baby.com who invited myself and several London blogger types, for a night out at #BenihanaChelsea on the Kings Road (easy to find, we jumped on a tube to Sloane Square, and walked up).

benihana instagramNow, I’ve know of this restaurant for years, the founder Rocky “Hiroaki” Aoki opened the first Benihana restaurant in 1964 in New York City. They are pioneers of “Teppan-yaki” dining, chefs combining dazzling performance and cooking freshest ingredients in front of diners.

We sat at a table for eight, and watched with delight as our chef Luke performed fantastic tricks with onion rings (volcanos and steam trains no less) – and cooked up some AMAZING food on the 300degree hot plate right in front of our eyes… bonkers! (There were a few comedy moments when Luke ‘accidentally’ threw an egg at me, and ‘squirted’ some fake soya sauce at Maggy)

benihana kidschaos bloggers eventSeriously – I’ve found another new place to take the kids for a special treat, I know they will LOVE the spectacle of it – they will love the vegetables (well, I’ve never had tastier courgette) and the freshest, melt-in-the-mouth fish… oh, and the (grown up) blackberry cocktails were divine.

Benihana UK have a new facebook page (with more photos of us!) and can be found in Chelsea and Piccadilly. A big thank you to Laura for inviting me, it was great to catch up with so many friends, and thank you too, to the attentive staff at Benihana, and in particular Dieter Kemp, Marketing Director for Benihana UK (who was full of stories about Rocky, and the history of Benihana, and kindly helped me with my chopstick technique!).

Oh, by the way, I’m also on twitter.com/MoreKidsChaos,  Erm, and funnily enough on Google+Facebook and Pinterest! Pop over to say hello x

Disclaimer: we were invited to the evening out by the BENIHANA management team.

read other views here:

http://missielizzie-meandmyshadow.blogspot.co.uk/2013/09/big-night-out-at-benihana-chelsea.html
http://domesticgoddesque.com/2013/09/benihana-chelsea-fun-family/
http://babesabouttown.com/2013/09/eat-london-with-kids-benihana-chelsea/
http://lifeatthezoo.com/2013/09/nights-benihana-chelsea/

http://www.reallykidfriendly.com/exciting-family-meal-and-egg-juggling-at-benihana

cooking with kids, crafts, gardening with kids

BlackberryTieDyeKidsChaos

BlackberryTieDyeKidsChaosTray

We love this time of year. Sad that the arrival of the brambles is a sure sign that Summer is on its way out, and Autumn is just around the corner….

If you are like us, and have picked a LOAD of blackberries already this year, we have a non-edible way of using them this Fall!

BlackberryTieDyeKidsChaosElasticBands

We picked a bucket-load before a weekend away, which meant we didn’t have time to eat them…so we froze them on a tray – using half for a smoothie, and the other half went into a pot of boiling water this week, deep enough for the old hemp carrier bag we had decided to tie-dye as a pressie for Granny’s birthday later in the year.

BlackberryTieDyeKidsChaosPopinthe-dye

Whilst the pan of blackberry-dye was simmering away on the stove, we got busy with elastic bands, pulling up sections of the hemp bag, (this works really well on old T-shirts or pillow cases) securing them tightly to create two ‘horns’ (as my son called them)….

BlackberryTieDyeKidsChaosRinse

We let the dye cool a little before adding the organic hemp bag, and rubber bands, which went into the pot with some chopped up rhubarb leaves – I read somewhere that this works as a fixative, helping to make the colour more ‘fast’…this bubbled away on the stove for about 45 minutes.

We then let this stand cooling for about an hour.

BlackberryTieDyeKidsChaostakingoffelasticbands

We then rinsed the bag and the boys were SO excited to pull the rubber bands away to reveal our spider cobwebs – we hung it up on the line to dry!

Much excitement that natural blackberries can make such a pretty colour – we plan to try some more natural dyes soon, our youngest loves brewing up nettle tea – and it also creates a lovely khaki green dye –

BlackberryTieDyeKidsChaosyoutube

something to try next!

Want to see me talking about this project? Click the link and photo left, to watch now…. Maggy Woodley from Red Ted Art hosted a fabulous “Fall Craft Ideas” hangout on Google+, (and in fact was the inspiration for the tie-dye experiment!).

Maggy talked us through some lovely owl crafts (how simple was the loo-roll owl?! and loved the walnut shell owls twittwoo) more links to follow from – Adele from playfullearners, and Anthea from bluebearwood. Also our anonymous blogger thefairyandthefrog and Rebecca from herecomethegirlsblog.

Oh, by the way, I’m also on twitter.com/MoreKidsChaos too… Erm, and funnily enough on Google+Facebook and Pinterest! Pop over to say hello x LIKE IT? Pin it!

Ali also writes over on AGreenerLifeforus.com. This is a commissioned story.

baking, cooking with kids

A great way of diverting your old jam jars or mason jars from the recycling, is to re-use them at least once… we use ours as drinking glasses, which the kids LOVE… encouraging them to make smoothies to share with the family – a great way of using up excess fruit and sneaking in your five a day!

A not-so-healthy option are cookies…Cookies you say? in a jam jar? uh? Well yes!
KidsChaosCookiesInAJar

These make excellent gifts, and are great for keeping in the cupboard, for when the baking urge takes you, and you’re short of time…

You will need (for four jam jars):

265g self raising flour
115g porridge oats
175g granulated sugar
1 and a half teaspoon baking powder
85g organic Fairtrade chocolate
(optional, I just think it makes a nice looking layer in the jar!)
150g chopped nuts (we used almonds – again for another layer, visually)
80g demerera sugar
and a handful of raisins, if your child can bear them!
(ours got taken out by 8yo…)

So, dividing each ingredient carefully across each jar, layer them up one at a time, so it creates a layered effect (like the coloured sands we used to have as kids!) make sure the jars are packed tight with ingredients.

THEN – when you’re ready to bake, today, or some time in the future, pour the dry ingredients into a mixing bowl, and simply mix in melted 265g butter (that’s 66g if you are just making up one jar of cookies!) and three heaped tablespoons of golden syrup (and that’s a flat tablespoon for just one jar) together, to a consistency which you can spoon in balls onto a greased baking tray…(I have to admit, you may have to add a bit of flour if the mixture looks a bit to sloppy to ‘spoon’).

Give the ‘balls’ space on the baking tray(s) otherwise they all melt into each other in the oven… bake at 180 degrees, for 10 minutes…they should look something like this, enjoy! >>KidsChaosCookiesInAJaronaplate

So, as you know, I’m on a weekly panel of crafty So-and-So-s invited to ‘hang-out’ on Google+ by the every lovely Maggy Woodley at Red Ted Art. This week this was hosted by Maggy AND Netmums.

KidsChaosCookiesInAJarNetMumshung out on Google+ for a bit of a vlog…(click the screengrab to watch!) with some craft buddies to share these holiday fun ideas, hosted by the aforementioned ever lovely Maggy from Red Ted Art who has pulled all of these together in a *Mason Jar* post. Also present were Kath from KnittyMummyAnthea with her Kids’ art keepsakes and butterflies, Liz and her fab matches in a jar for camping! Pop back later for more links soon.

Oh, by the way, I’m also on twitter.com/MoreKidsChaos too… Erm, and funnily enough on Google+Facebook and Pinterest! Pop over to say hello x Like it? Pin it!

Ali also writes over on AGreenerLifeforus.com
Follow on Bloglovin

For more Cooking with Kids recipes, join my community over on Google+ here.

cooking with kids

salmon with ginger and soya sauce recipe

Salmon with ginger and soya sauce recipe – a quick one, once you’ve marinated the salmon, (I did this for about half an hour, whilst washing up, and allowing the oven is heating up to 180 degrees). The kids love the simplicity of this, plus click here for a delicious squid taglietelle our kids love making and eating…

You will need (for four people):

Four salmon fillets
Half a red onion finely chopped
Quarter red pepper finely diced
Two garlic cloves finely chopped
4cm root ginger grated
large tablespoon chopped fresh coriander
80ml soya sauce
Two tablespoons of honey

Mix EVERYTHING together, (except the salmon) – and THEN add the salmon, spooning over the mixture, so all of the salmon steaks are all covered. Once the oven is hot enough, place the salmon fillets onto a baking tray, spoon over the mixture, make sure that each salmon fillet has space around it for even cooking… and cover the tray in a little tin foil tent, sealing in, trying not to actually touch the salmon. Pop in the over for about twelve mins, whilst you are cooking your accompanying new potatoes – and serve!

Oh, and I’m on twitter.com/MoreKidsChaos too… Erm, and funnily enough on Google+Facebook and Pinterest! Pop over to say hello x Like it? Pin it!

Ali also writes over on AGreenerLifeforus.com
Follow on Bloglovin

For more Cooking with Kids recipes, join my community over on Google+ here.

baking, cooking with kids, gardening with kids

Lavender-Scones-KidsChaos
Lavender-Scones-Jam-KidsChaosSo much lovely lavender about, everyone seems to have some in their front garden around here… and it smells so lovely – I ‘pinched’ some from my neighbour’s garden last week (I blame CountryWives and their lavender biscuit recipe – according to them apparently Kate Middleton has been craving lavender biscuits during her pregnancy!)

So, the neighbour returned from her annual hols, to find a few sprigs missing from her lavender bush… guilt took over, and I popped over there, with a bag of flower and a baking tray and we made THESE lavender scones – so easy, and it’s all I could do to stop the kids from scoffing the lot after school… here’s the recipe >>

100g caster sugar (we used some lavender sugar Maggy made last month)
300g plain flour
25g baking powder
100g cold, diced butter
200ml soured milk (yep, we had that too, her milk had gone off in the fridge)
1 egg

Preheat the oven to 200°C (400°F) mark 6.
Sieve the flour and baking powder together into a large bowl. Add the diced butter and rub it into the flour until the mixture looks and feels like breadcrumbs.

Pour the soured milk into a small saucepan and warm it gently. Whisk in the egg and sugar and pour the milk into the flour, mixing it all together. Leave this dough to rest for five minutes, then pop it onto a lightly floured work surface and knead it together to form a ball.
Roll out this dough into a rectangle with a thickness of about 1.5cm. Cut out roughly 12 scones and place them onto a baking sheet. Lightly dust the scones with some more flour, and then leave them to stand for 10 minutes before baking. During this time the baking powder will get the little scones rising.
Cook the scones in the preheated oven until golden brown; they will take about 11 minutes.

Another neighbour had kindly donated a tub of Rodda’s Cream (the clotted cream to die for), so we had a delicious ‘lunch’!

I’m on a weekly panel of crafty So-and-So-s invited to ‘hang-out’ on Google+ by the every lovely Maggy from Red Ted Art who talked about lavender bags and how to make a-lavender wand, and lavender bath sachets and finally how to make no sew lavender bags pillows.. I do enjoy hanging out on Google+ for a bit of a vlog…(click the screengrab to watch) with some craft buddies to share these lavender thoughts,  Joined by Anthea talking lavender cookies and Kelly with some beautifully amazing lavender fans, and Lizzie was there in spirit homemade lavender lemonade….

Lavender-you-tube-ali-clifford

Oh, and I’m on twitter.com/MoreKidsChaos too… Erm, and funnily enough onGoogle+Facebook and Pinterest! Pop over to say hello x Like it? Pin it!

Ali also writes over on AGreenerLifeforus.com
Follow on Bloglovin

cooking with kids, gardening, gardening with kids, google+ hangouts, kids

KidsChaosPapierMache-craft-how-to-MAKEChaos writes:

So… what does one do with cereal boxes, if you can’t bear to stick them in the recycling, how about cooking up some cute little Papiermâché seedling pots.

We ripped the cardboard cereal boxes and rice cake boxes into small pieces, and gave them a good soaking. Then pulped the pieces with water, in the blender (sssh, don’t tell Daddy).

Draining the pulp in a colander, squeezing the excess water. Flour the work surface, and mix, knead in some flour {SECRET INGREDIENT ALERT!}.
And take small quantities, pushing into the silicone muffin cases to mold the little pots. We air-dried the pots over-night, however, for speed, you could pop them into the oven, if you were baking spuds, or home-made pizza anyway!

We DID try to make a batch of these seedling pots in conventional metal cake trays… FAIL!, they set solid, glued in… so yes, silicone rules!

If you’re looking for these silicone muffin cases you can find them here in the US and here in the UK (affiliate links)
KidsChaosPAPERMACHE

Click this image below to watch the youtube video of our Google+ hangout – and watch Maggy from Red Ted Art sharing her shadow puppet theatre and her ‘everlasting’ picture frame, Playful Learners made another gorgeous puppet theatre Aly at Plus 2 Point 4 showed us how to use a box as a weaving loom, and my fave, Me and My Shadow and her vintage style secret book

To read more on our gardening adventures click here to see where we got our delicious compost for our seedlings.

To see how our garden grows, follow our Gardening With Kids posts here.

and how to make an indoor watering can here!

Oh, and I’m on twitter.com/MoreKidsChaos too… Erm, and funnily enough on Facebook and Pinterest! Pop over to say hello x Like it? Pin it! Ali  also writes at aGreenerLifeforus.com.