crafts, create, FREE printables, gardening, gardening with kids, google+ hangouts

Who would have thought we would be making a fairy tale craft tonight – Fridays are usually our ‘film night’ after a full-on week at school.

fairytale crafts

HOWEVER, I was taken to one side by my son’s teacher on Thursday to discuss his behaviour – and we between us to set a reward system in place… sigh, just when I thought we were getting somewhere!

So, the plan is, a thumbs up from the teacher = one reward point. And so the Jack and the Beanstalk fairytale craft reward chart was invented. And he is really engaged with it so far – we found an old wooden shelf I’d been hoarding since our kitchen cupboard makeovers (11yo wanted me to write that if you don’t have a piece of board, a sheet of paper or card will do), and found a wiggly stick on the way home from school – and got busy!.

Jack and the Beanstalk printable

To get started, cut out your leaves – If you use the FREE printable here – gently stick the sheet to another blank A4 sheet with a low tack magic tape, and cut around the leaves. This gives you a printed leaf, and a plain white leaf. Place the plain white leaves in position on the board, and using them as stencils, put a little paint on a scrunched up piece of kitchen paper, and dab around the edge of the paper leaf to reveal a leaf shape.

Glue the branch of the fairy tale craft beanstalk onto your board (oh yes, I DID use a glue gun), and pop the green leaves somewhere safe. We used a CD sleeve, which we glued to the top of the board to make a pocket to hold the leaves. And rewarded the boy with his first ‘thumbs up’ leaf at the foot of the beanstalk – here’s to a completed beanstalk for Jack to climb up by the end of the week… Also on the blog today – how to make the Snow White Mirror.

kidschaos and redtedart hangout

If you’d like to see the finished fairy tale craft article, click the youtube link here, I got together with Missie Lizzie who talked magic beans, Anthea with her elves’ shoes, Kelly talked Rapunzel, and Maggy at Red Ted Art (talking three little pigs) who hosted a Fairy Tale Craft google+ hangout.

Oh, and I’m on twitter and Instagram is my new favourite thing, I also blog at incredibusy.com, and Erm, and funnily enough on Facebook and Pinterest! Pop over to say hello x Like it? Pin it!

cooking with kids, crafts, gardening with kids

BlackberryTieDyeKidsChaos

BlackberryTieDyeKidsChaosTray

We love this time of year. Sad that the arrival of the brambles is a sure sign that Summer is on its way out, and Autumn is just around the corner….

If you are like us, and have picked a LOAD of blackberries already this year, we have a non-edible way of using them this Fall!

BlackberryTieDyeKidsChaosElasticBands

We picked a bucket-load before a weekend away, which meant we didn’t have time to eat them…so we froze them on a tray – using half for a smoothie, and the other half went into a pot of boiling water this week, deep enough for the old hemp carrier bag we had decided to tie-dye as a pressie for Granny’s birthday later in the year.

BlackberryTieDyeKidsChaosPopinthe-dye

Whilst the pan of blackberry-dye was simmering away on the stove, we got busy with elastic bands, pulling up sections of the hemp bag, (this works really well on old T-shirts or pillow cases) securing them tightly to create two ‘horns’ (as my son called them)….

BlackberryTieDyeKidsChaosRinse

We let the dye cool a little before adding the organic hemp bag, and rubber bands, which went into the pot with some chopped up rhubarb leaves – I read somewhere that this works as a fixative, helping to make the colour more ‘fast’…this bubbled away on the stove for about 45 minutes.

We then let this stand cooling for about an hour.

BlackberryTieDyeKidsChaostakingoffelasticbands

We then rinsed the bag and the boys were SO excited to pull the rubber bands away to reveal our spider cobwebs – we hung it up on the line to dry!

Much excitement that natural blackberries can make such a pretty colour – we plan to try some more natural dyes soon, our youngest loves brewing up nettle tea – and it also creates a lovely khaki green dye –

BlackberryTieDyeKidsChaosyoutube

something to try next!

Want to see me talking about this project? Click the link and photo left, to watch now…. Maggy Woodley from Red Ted Art hosted a fabulous “Fall Craft Ideas” hangout on Google+, (and in fact was the inspiration for the tie-dye experiment!).

Maggy talked us through some lovely owl crafts (how simple was the loo-roll owl?! and loved the walnut shell owls twittwoo) more links to follow from – Adele from playfullearners, and Anthea from bluebearwood. Also our anonymous blogger thefairyandthefrog and Rebecca from herecomethegirlsblog.

Oh, by the way, I’m also on twitter.com/MoreKidsChaos too… Erm, and funnily enough on Google+Facebook and Pinterest! Pop over to say hello x LIKE IT? Pin it!

Ali also writes over on AGreenerLifeforus.com. This is a commissioned story.

baking, cooking with kids, gardening with kids

Lavender-Scones-KidsChaos
Lavender-Scones-Jam-KidsChaosSo much lovely lavender about, everyone seems to have some in their front garden around here… and it smells so lovely – I ‘pinched’ some from my neighbour’s garden last week (I blame CountryWives and their lavender biscuit recipe – according to them apparently Kate Middleton has been craving lavender biscuits during her pregnancy!)

So, the neighbour returned from her annual hols, to find a few sprigs missing from her lavender bush… guilt took over, and I popped over there, with a bag of flower and a baking tray and we made THESE lavender scones – so easy, and it’s all I could do to stop the kids from scoffing the lot after school… here’s the recipe >>

100g caster sugar (we used some lavender sugar Maggy made last month)
300g plain flour
25g baking powder
100g cold, diced butter
200ml soured milk (yep, we had that too, her milk had gone off in the fridge)
1 egg

Preheat the oven to 200°C (400°F) mark 6.
Sieve the flour and baking powder together into a large bowl. Add the diced butter and rub it into the flour until the mixture looks and feels like breadcrumbs.

Pour the soured milk into a small saucepan and warm it gently. Whisk in the egg and sugar and pour the milk into the flour, mixing it all together. Leave this dough to rest for five minutes, then pop it onto a lightly floured work surface and knead it together to form a ball.
Roll out this dough into a rectangle with a thickness of about 1.5cm. Cut out roughly 12 scones and place them onto a baking sheet. Lightly dust the scones with some more flour, and then leave them to stand for 10 minutes before baking. During this time the baking powder will get the little scones rising.
Cook the scones in the preheated oven until golden brown; they will take about 11 minutes.

Another neighbour had kindly donated a tub of Rodda’s Cream (the clotted cream to die for), so we had a delicious ‘lunch’!

I’m on a weekly panel of crafty So-and-So-s invited to ‘hang-out’ on Google+ by the every lovely Maggy from Red Ted Art who talked about lavender bags and how to make a-lavender wand, and lavender bath sachets and finally how to make no sew lavender bags pillows.. I do enjoy hanging out on Google+ for a bit of a vlog…(click the screengrab to watch) with some craft buddies to share these lavender thoughts,  Joined by Anthea talking lavender cookies and Kelly with some beautifully amazing lavender fans, and Lizzie was there in spirit homemade lavender lemonade….

Lavender-you-tube-ali-clifford

Oh, and I’m on twitter.com/MoreKidsChaos too… Erm, and funnily enough onGoogle+Facebook and Pinterest! Pop over to say hello x Like it? Pin it!

Ali also writes over on AGreenerLifeforus.com
Follow on Bloglovin

crafts, gardening with kids, google+ hangouts, kids, Uncategorized

Follow my blog with Bloglovin
Andy Goldsworthy inspired
FlowersBuildKidsChaosThis week my darling boys got busy with some Andy Goldsworthy style flower arranging! Well, they made some gloopy papier mache glue (recipe here: two parts water, one part flour, nuked in the microwave for 50 seconds…stir stir stir the lumps out as best you can).

Then they painted the patio and started building up their pattern of summer leaves and petals. It has to be said, 10yo particularly LIKES working with colour patterns, you only have to look at his gogo crazy bones collection which he has displayed by colour, and he LOVED David T Waller’s amazing Toy Atlas Rainbow – the hundreds of toy cars… oh, click here to see it…

This is a fabulous way to explore the science of plant decomposition too – watching as the petals’ colour changes over a period of days – and the release of carbon dioxide…

If you’d like to see how our own patio art works with Autumn / Winter leaves – take a look at the ‘sculpture’ we made with the neighbour’s children – read more here, taking inspiration again from the fabulous Andy Goldsworthy and RedTedArt of course.

10yo boy was really excited to tell his Dad all about this, and has decided that he will cover the entire patio for his birthday, in November, so watch this space!

Anyway, as you know, I’m on a weekly panel of crafty So-and-So-s invited to ‘hang-out’ on Google+ by the every lovely Maggy Woodley at Red Ted Art.

I’m hanging out on Google+ for a bit of a vlog…(click the screengrab to watch) with some craft buddies to share these flowers and leaves ideas, hosted by the aforementioned ever lovely Maggy from Red Ted Art. who made flower crowns and showed us how to press flowers and cute woodland people. Also present are Anna, Crystal, Anthea’s wild grass seed head artKelly‘s amazing helicopter seed thank you cards for teachersLiz was featured with her diy flower-petal paintsThe fairy and the frog’s discovery bottle Pop back later for more links soon.

KidsChaosFlowersYouTube

Oh, and I’m on twitter.com/MoreKidsChaos too… Erm, and funnily enough onGoogle+Facebook and Pinterest! Pop over to say hello x Like it? Pin it!

Ali also writes over on AGreenerLifeforus.com
Follow on Bloglovin

gardening, gardening with kids, kids, life

Chaos writes:

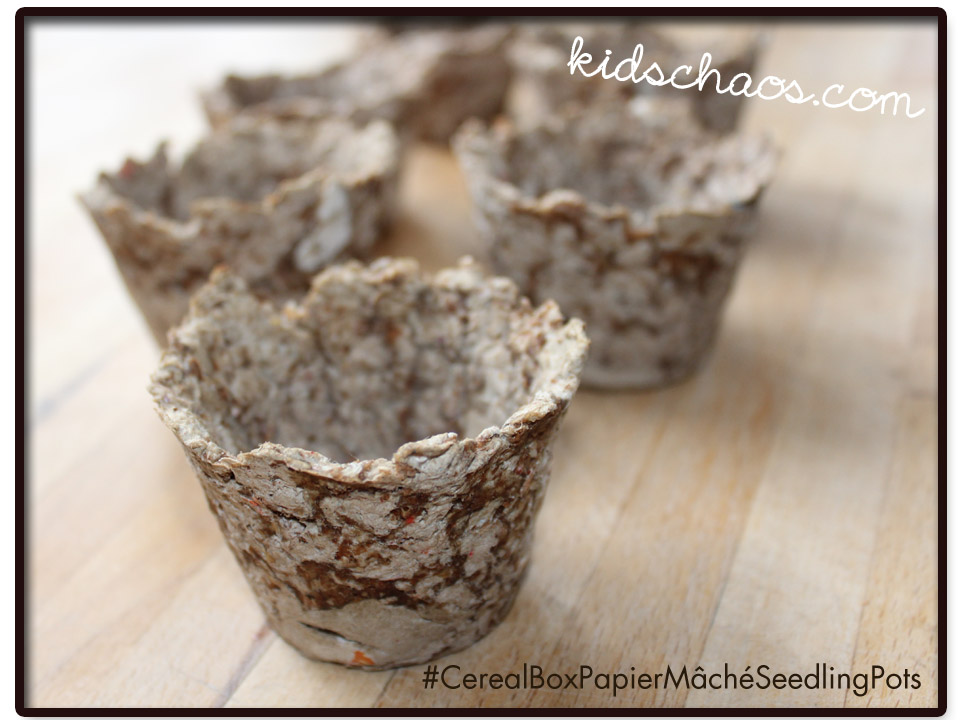
Out in the garden this morning before school, grabbing some compost for the little Papiermâché seedling pots pictured below.KidsChaosCompostTreasures

And look! (actually, look away now if you’re squeamish about worms… oh, too late…)

There was a potato growing deep at the bottom of the hotbin compost bin! I’ve pulled him out, and re-planted the little spud, how exciting – looking forward to harvesting them later in the year 🙂 #composttreasures

To read more on our gardening adventures click here to see where we got our delicious compost for our seedlings.
KidsChaosPAPERMACHETo see how our garden grows, follow our Gardening With Kids posts here.

and how to make an indoor watering can here!

Are you on Google+ Follow me here, and say hello, and I’ll add you back to my circles.

Oh, and I’m on twitter.com/MoreKidsChaos too… Erm, and funnily enough on Facebook and Pinterest! Pop over to say hello x Like it? Pin it!
Ali also writes over on AGreenerLifeforus.com
crafts, education, gardening, gardening with kids, kids

Chaos writes:

growing seeds in toilet roll tubesSo, you may have read my previous post about the lovely @soggywelly sending us some random seeds and beans? Well… look how they are shooting up!
my Mother used to make these newspaper planters (and, having shot the video of lovely Maggy Red Ted Art demonstrating how to make them).

Really simple to do with the kids, and to involve them with planting the seeds and beans. We also made some cute little labels – thank you Life at the Zoo for the inspiration!

And along with the toilet roll tubes, these can be popped straight into the earth in the garden – although, it’s so cold here at the moment, I think we’ll keep them on the window sill for a little longer!

We’ve popped these on the sitting room window sill, it’s only little greenhouse, and keep a little plastic milk bottle beside the seeds, with a few holes punched into the lid so that we don’t forget to water them… something 8yo feels proud to ‘be in charge of’ – and excited every day at their growth rate!

To see how our garden grows, follow our Gardening With Kids posts here.

And find out how to use your toilet roll tubes to make bird seed feeders too.

Are you on Google+ Follow me here, and say hello, and I’ll add you back to my circles.

Oh, and I’m on twitter.com/MoreKidsChaos too… Erm, and funnily enough on Facebook and Pinterest! Pop over to say hello x


gardening with kids, kids

Chaos writes:

Well, I have to say, I do love my new camera. It was an unexpected gift from my lovely husband, a complete surprise, but what a difference it’s made to my life!

It’s a Canon EOS 600D and such a joy to use…. I’ve taken loads more photos of the boys, and it’s been great for the blog – as I DO love the old depth of field thing… see what you think!

toilet roll tube bird seedPapier-mâché seedling pots by KidsChaosPine Cone Hedgehog

crafts, gardening, gardening with kids, key stage 2

Chaos writes:

Get Planting with KidsChaosIt’s that time of year again! March is here at last, the sun is shining, and I cycled to the Post Office to pick up a parcel, which could not be delivered as the sender had not put enough stamps on the envelope! Mustn’t grumble, as it was a parcel from the lovely Sue at @SoggyWelly (a new friend  – through the gorgeous Georgie @TheFlowerFarmer, go follow them both!) with some seeds she wouldn’t be using (oh, how I love twitter).

Love how she addressed me on the envelope, ‘Veg Lady’ – that had them giggling at the Post Office!

We’ve got some delicious compost from our compost bin! We wanted to wait three months for the compost to “develop” and we still had our old ‘bee-hive’ bin which had been a birthday pressie from WigglyWigglers SOME time ago (wow, I hear you say, your family really know how to treat you on your special days!). The kids are really excited about getting stuck in! Wellies at the ready….

This new compost bin, and therefore the compost…. though, woah, it’s GOOD!

http://thegoodlifebloggers.com/wp-content/uploads/2012/04/hotbin.jpgIt’s a *HotBin* and can achieve hot composting between 40-60 °C, which means it’s producing a rich compost faster.

It has a little thermometer on the top, which satisfyingly tells you how HOT your compost is!
As hotter temperatures can be achieved we can recycle more types of household waste including food waste, grass cuttings, shredded paper etc. So great for land-fill-avoidance. And fascinating for the kids too!

The website is brilliant, with informative PDFs and videos. We have had great support from their team, for example they sent us a new filter through the post, and emailed a link to a simple ‘how to’ video…. Fantastic Customer Support!

We’ve got rocket, tomatoes, salad leaves, and more – I’ll be back tomorrow with news on our planting, will let you know how we get on! 🙂

Click here for a delicious recipe with Rocket and click here if you’d like to read our quick and easy Pizza recipe.

To see how our garden grows, follow our Gardening With Kids posts here.