crafts, create

Button Crafts for Get Your Craft On Challenge

Every month we run a craft challenge on a theme – May is #ButtonCrafts.

button craftsShare your Button Crafts photos on Instagram, or over on Twitter, using the hashtag #GetYourCraftOn, add your link to the linky below, and we’ll pick the best ones to feature here on the host blog the following month. (and on our Pinterest board too)

The photos you share do not have to be of the finished article – let’s see your work in progress as well as your completed masterpieces! Anything related to the #Button crafts topic. Just tag them with #GetYourCraftOn and follow and tag us too so we know you’re taking part) Our team’s four Instagram accounts are: @incredibusy (that’s me!), @redtedart @bluebearwood & @missielizzie.

This month’s Craft Challenge is #Sheep Crafts in honour of the #ChineseNewYear #GetYourCraftOn, and add your link to the linky below and check out our Pinterest board too.

FOLLOW #GetYourCraftOn team’s Instagram accounts @incredibusy @redtedart @bluebearwood & @missielizzie

BritMumsoh, and if you have a couple of minutes, any chance you can vote for me for best social media expert in the BritMums BiBs awards HERE


crafts, create, education, key stage 2, kids, monster

Piper – a Minecraft toolbox for anyone to create and invent with technology. Build electronics. Invent power-ups. Create the future.

So – the kids were pretty excited last week to hear from Mark at Piper all about their fabulous new toolbox for budding engineers who happen to like Minecraft!
As a family we tend to use ‘screentime’ as a reward at the end of the week, for best behaviour, and finishing homework without it being an excruciating teeth-pulling exercise. Minecraft is their favourite ‘go to’ game, and without further ado, read what our 10yo thought of Piper, and then watch the video!

In short, my son, 10yo RB says this:

“Minecraft toolbox – Build electronics with Piper. Piper is brilliant for seven and ups. I think it is really awesome because the instructions are in the game so it would make children and adults interested in making things outside of the game. Minecraft is a good way to get people that like Minecraft to play it. It will make a brilliant Christmas or birthday gift. It will entice people to play because it is easy to build so you can get started really quickly.  Raspberry Pi is what all of the software runs on. Raspberry pie is a mini computer if you’ve got all the right equipment and gadgets luckily all of that comes in a really well made wooden box. The screen comes readymade and all fits in.

There are ten action-packed levels to complete in the game. You have to make your own buttons and fit the wires in the right places. The mouse comes with the box so you can look around.

There are lots more interesting exciting things about the game but they are for you to find out.”

RB Age 10 says – “NOW watch this video!”

How it works:

– First you assemble the wooden toolbox and connect it with the Raspberry Pi 2, a 7 inch LCD display, a power bank, and an assortment of electronics.

– Once assembled, you enter a Minecraft adventure map viewable on the LCD screen.

– Your Mission: guide a robot to rescue astronauts on a foreign planet. The robot’s hardware is damaged on the way over, and you have to build it in real-life to control the robot in the game to save the day!

How this educates kids:

– Each gadget you build gives you a special power-up and progresses you through the game

– First build the controller to navigate your robot. Add switches to activate hidden bridges and doors. A row of lights to serve as a proximity sensor and more.

If you want to find out more, click here. Piper are on facebook and twitter.

Ali also blogs over on aGreenerLifeforus.com and FunCraftsKids.com and is a new lover of Instagram too… pop over and say hello!

chinese new year, crafts, FREE printables, key stage 2, kids, life

Hand Coloured Chinese Lanterns
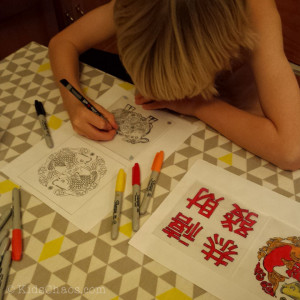
Chinese New Year PrintablesMy little blonde boys are both incredibly fascinated by the Orient, and at the beginning of every year are keen to go to Chinatown to celebrate Chinese New Year. We are lucky enough to be close to London’s Chinatown and a couple of years ago they bought some rather lovely window clings, graphic and colourful, but really too big for their bedroom windows in our Edwardian house.

Chinese-New-Year-Printables-KidsChaos-4Chinese-New-Year-Printables-KidsChaos-3 So this year, we came up with a fun way of making their own, from a template I created here (and if you click here and here you can download and print these Chinese New Year printables yourself too).

You will need:

Printable-Chinese-New-Year-graphics-KidsChaos-2-of-21) Print off the Chinese New Year printables template here and here
2) Packet of Sharpie Pens (*which you can get here in the UK  and here in the US)
3) Pack of Clear CD wallets or any plastic stationery sleeves
4) Blu tack

Instructions:

Printable-Chinese-New-Year-graphics-KidsChaos-1-of-21) once you’ve printed off the Chinese New Year printables template, blu tack the clear plastic cd wallet into position over the graphic and start tracing around the illustration with a black sharpie pen.

2) Then simply colour in with a selection of reds, yellow, oranges. Or if you fancy a change, try a range of greens and blues – that looks great too!

3) When you’ve finished, take the CD wallet and blu tack it to the window! voila!Chinese-New-Year-Printables-KidsChaos-5

To watch a video of how we did these Chinese New Year printables, pop over to Red Ted Art’s YouTube channel here where we have made a guest appearance (again!) showing you how to do this, you’ll notice that I got bored with the colouring in bit, and Maggy had to take over… as a Chinese inspired art project however, both of my boys LOVED doing these, and it kept them busy and quiet for AGES!
10 yo specifically asked for a sheep… as it IS year of the sheep!

Ali also blogs over on aGreenerLifeforus.com and FunCraftsKids.com and is a new lover of Instagram too… pop over and say hello!

 *affiliate links for your convenience… 🙂

crafts

Tissue Paper Plate Wreath

Tissue-Paper-Plate-Wreath--Front-KidsChaosWe do rather love a home made wreath in our house at Christmas, so much so that every year there is a battle as to whose is featured on the front door!

So our home made wreaths tend to find their way fixed to the various interior doors of the house, and just as well with this one, as it’s made from a paper plate, and some green tissue paper!

Tissue-Paper-Plate-Wreath-Back-KidsChaosOur youngest designed this one himself, and was pretty easy to make, using three different shades of green tissue paper, ripped, scrunched and glued to the front of a paper plate, which had previously been cut into the shape of a wreath (or a polo mint, if you’re a 10yo boy!)

Have fun! If you enjoyed that wreath – check out this one made from old books! 


crafts, create, father's day

Fimo-Moustache-Jewellery-2-KidsChaos Fimo-Moustache-Jewellery-3-KidsChaosFimo Moustache jewellery

I’ve been using Fimo as a modelling clay for a very long time – back to my Art Student days when I was making rather scary necklaces, with big spiky teeth!

And the husband is bit of a moustache fan, so we decided to make him a Mustache badge from fimo, for a little stocking filler for Christmas.Fimo-Moustache-Jewellery-1-KidsChaos

You will need:

Fimo
Kitchen knife
Grease proof paper
Template

Position the template on the fimo, and cut around with the knife.

Place the fimo onto the greaseproof paper and bake in the over for 25 minutes at 120 degrees.

When cool, glue a jewellery brooch back attachment (or safety pin) to the back of the moustache to create a brooch…

Moustache-Jewellery-KidsChaosclick this link to download the template Moustache Jewellery KidsChaos

Another fab idea is to take the Moustache brooch, and pin it to the front of a folded card, and get your child to draw a face to go with it! I’ve attached another Happy Birthday template KidsChaos template to illustrate just what I mean!

Happy-Birthday-template-KidsChaos-exampleAli also blogs over on aGreenerLifeforus.com and is a new lover of Instagram too… pop over and say hello!


crafts, create, key stage 2, kids

Traditional Paper Star

The boys just love a paper craft, and we can thank our lovely friend Maggy for that (she told me to say that…) – Maggy taught them how to make origami paper boats when they were very little, and now at 10, the youngest is forever making Ninja Stars, Jumping Frogs and Paper cranes – and now his latest, the Traditional Paper Star.traditional paper star

For this lovely origami traditional Paper Star you need 14-15 square origami sheets, of various colours (we tried to persuade him to make them in Christmas colours, however, he is ‘his own man’ and went with these colours!) It literally only takes minutes to learn how to make this!

Fold each piece of paper to the long triangular shape, follow the youtube instructions linked here… demonstrated by the lovely Maggy from RedTedArt… and insert one into another until you join the first with the last to create this star shape – how lovely, we’ll be hanging this creation on the Christmas Tree next weekend!

Ali also blogs over on aGreenerLifeforus.com and is a new lover of Instagram too… pop over and say hello!


baking, cooking with kids, crafts

Melted Hama Beads and Perler Bead Craft

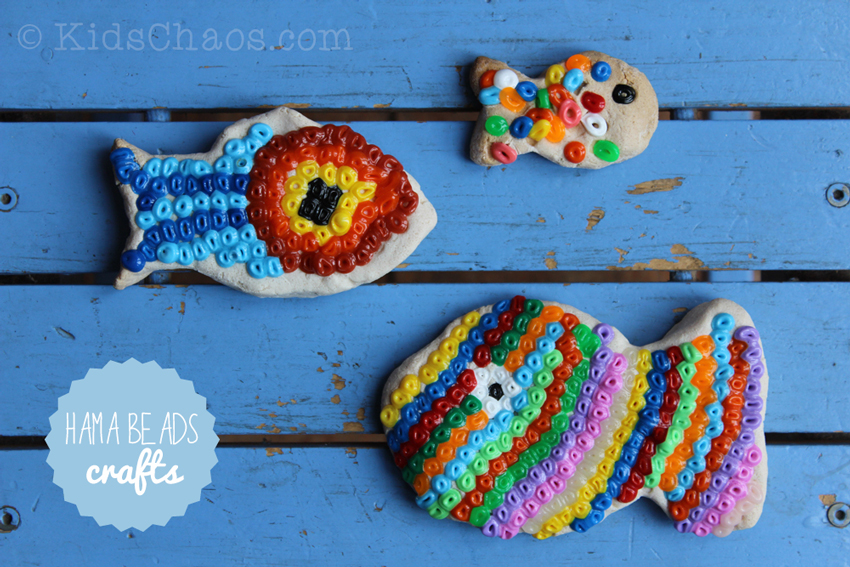
A quick one to share with you today – we made some cute Melted Hama Beads (or Perler Bead) Fish! I’ll let you guess which one I did… which one was Maggy redtedart’s and which one my 11yo son created!Hama Bead Perler Bead Craft

You can use cookie cutters with your salt dough for this fun craft, however salt dough is so malleable that you could also simply shape the dough by hand.

Push your hama beads gently into the dough in your desired pattern, place the dough shape onto some grease proof paper, and onto a baking tray and pop into the oven on a very low temperature, and just keep an eye on it! As the perler beads start to melt, bring the tray out of the oven and allow to cool. fun eh?!

For salt dough recipes, check out http://www.redtedart.com/2013/12/02/easy-salt-dough-recipe-stars/

Ali also blogs over on aGreenerLifeforus.com and is a new lover of Instagram too… pop over and say hello!


baking, cooking with kids, crafts

Every month we run a craft challenge on a theme – November is #Snowman #Crafts.

snowman craftsOur first contribution is our snowman sandwich – a quick post-school pick-me-up!
Using two circular cookie cutters, (one for the head, one for the body) we cut a snowman shape out of one slice of bread… Buttering the other slice with peanut butter (or jam, if you have a peanut allergy!)
Sprinkle over some icing sugar, and place the second slice of bread over the top, adding silver baubles for buttons, and raisins for the eyes – you’re away!

Share your Snowman Crafts photos on Instagram, or over on Twitter, using the hashtag #GetYourCraftOn, add your link to the linky below, and we’ll pick the best ones to feature here on the host blog the following month. (and on our Pinterest board too)

The photos you share do not have to be of the finished article – let’s see your work in progress as well as your completed masterpieces! Anything related to the #SnowMan crafts or #Olaf (! if you’re Frozen fans) topic. Just tag them with #GetYourCraftOn and follow and tag us too so we know you’re taking part) Our team’s four Instagram accounts are: @incredibusy (that’s me!), @redtedart @bluebearwood &@missielizzie.

[inlinkz_linkup id=463725 mode=1]

So what’s #GetYourCraftOn?

It’s a monthly craft challenge organised by four bloggers – zingzingtree, Red Ted ArtMe And My ShadowKids Chaos (me!)

Ali also blogs over on aGreenerLifeforus.com and is a new lover of Instagram too… pop over and say hello!

crafts, create, google+ hangouts

T Shirt Yarn Pom Pom

T Shirt Yarn Pom-Pom

We’ve all of us got an old T-shirt lying about don’t we? I had a very favourite, Breton Stripe T which had sadly come to the end of its life, and was just to scruffy to go to the charity shop, so we decided to DO something with it, and as we’ve gone a little pom-pom crazy this month, thought we’d have a go at the old classic – a T Shirt Yarn Pom Pom!

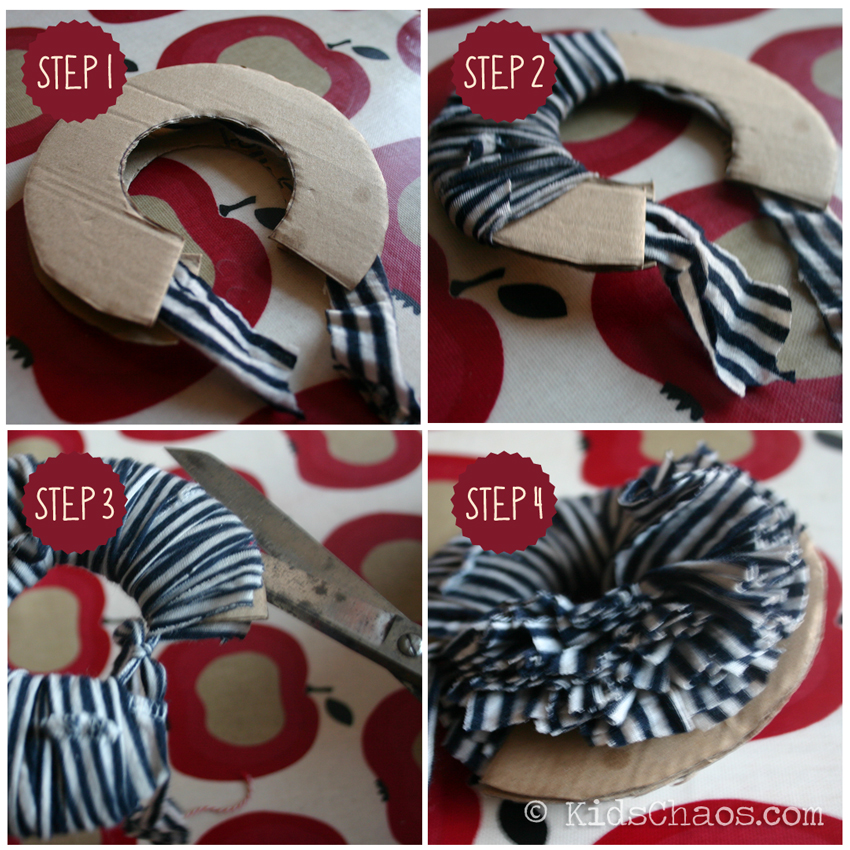
So, you could use a big pom-pom maker, or, like us, grab a couple of ‘donuts’ of cardboard, and have a go…

Step 1 – using a mug as a template, we cut two circular donuts, and lay them on top of each other.

Step 2 – cut your T-shirt into long strips to make ‘yarn’ and lay one piece of this yarn between the two donuts.

Step 3 – Wrap the T-shirt yarn around and around the donuts, and tie off the centre strip of yarn in a knot.

Step 4 – Push your scissors between the two donuts and snip around the circle as you would a regular pom-pom!

T Shirt Yarn Pom-Pom

We love how this one turned out and will be collecting our old T-shirts to have a go and MORE T Shirt Yarn Pom-Poms soon!

If you liked this post you might like to click here for FULL HOW TO instructions on making paper pom-poms

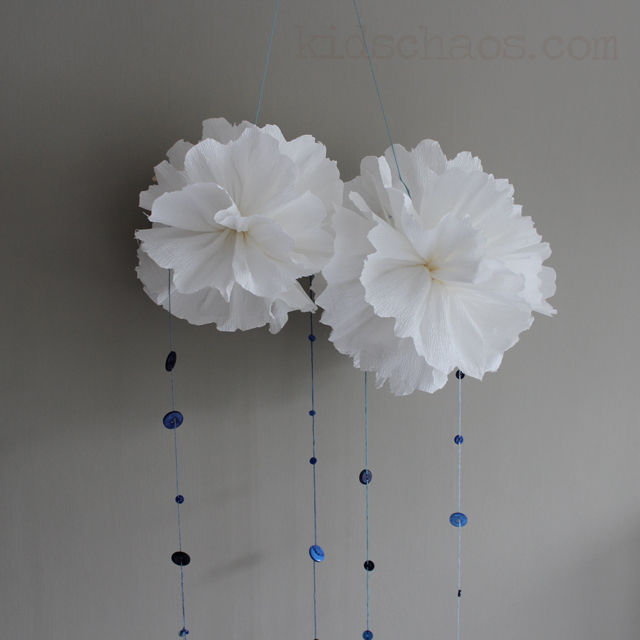
If you have a thing for giant paper pompoms, click here to see our crepe paper version, with raindrops!

Ali also blogs over on aGreenerLifeforus.com and is a lover of Instagram too… pop over and say hello!

crafts, create, halloween

HOW TO make paper pom-pomspaper pom-pom clouds

We posted a link to one of our most popular instagram pictures a few month’s ago – these crepe paper pom-pom clouds, with button raindrops which had everybody gasping with delight – and didn’t get around to actually posting a full how to, so here we go… (you can see why it took so long to post a ‘how to’ – LOTS of photos!)

step-1-4-make-a-paper-pom-pom

1, 2) Concertina fold 8-10 sheets of tissue paper
3) Tie a length of string to the centre of the folded paper
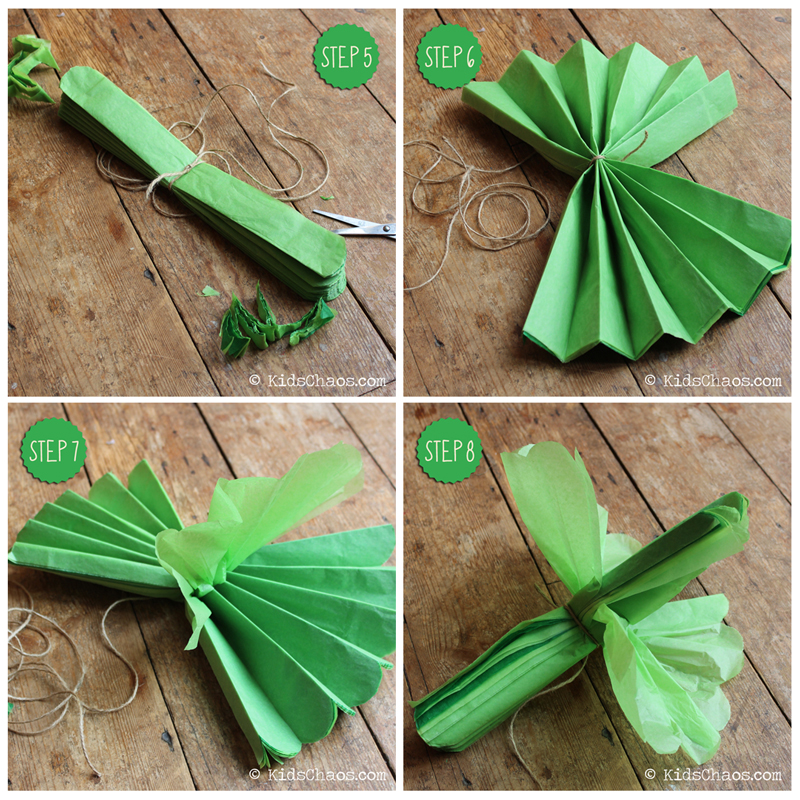
4, 5) Trim the two ends of the folded concertina paper in a curve (keep the off-cuts, you never know when you might need them!)

step-5-8-make-a-paper-pom-pom6) Fan the pom-pom out flat as it will go
7) Pull up one thin sheet of tissue paper at 90 degrees
8) Pull out the opposite sheet of tissue paper, at 90 degrees

9) Rotate the tissue paper pom-pom and pull out opposite sheets of the paper
10) Keep pulling and fluffing the single sheets of tissue paper to create the paper pompom.

step-9-12-make-a-paper-pom-pom

and that’s it! – to see how you can create something quite amazing to hang in your bedroom, click here to see our crepe paper version, with raindrops!

If you fancy having a go yourself click here, alternative you can purchase them here at Delights in packs of three!

Ali also blogs over on aGreenerLifeforus.com and is a new lover of Instagram too… pop over and say hello!